
How to replace an axle shaft yourself
Learn how to replace an axle shaft yourself using this step-by-step guide
Replacing an axle shaft at home is a task that requires some mechanical knowledge, the right tools, and safety precautions. If you’re comfortable working on your vehicle and have the necessary tools, you can replace an axle shaft yourself at home using this step-by-step guide:
Here are the tools you need to replace an axle shaft
• A floor jack and jack stands. Do NOT even think about doing this job 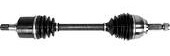 without them.
• 3/8” and ½” drive sockets, ratchets and breaker bars
• A long, sturdy pry bar. You can rent a tie rod end and ball joint separator tool from the auto parts store.
• an inexpensive digital angle gauge.
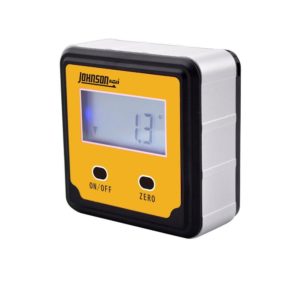 Measure the camber angle with the digital angle gauge
1) With the vehicle on jack stands, remove the wheel from the vehicle.
2) Reinstall at least two lug nuts firmly onto the wheel studs, with the flat side of the nuts touching the rotor. This will keep the rotor in contact with the wheel hub.
3) Attach the angle gauge to the face of the rotor using the angle gauge magnet. Turn on the angle gauge and measure the angle. Write it down. You’ll use this angle measurement to reassemble the axle back to the same angle as you finish the job. Work on one side at a time.
Disassemble brakes and disconnect steering and suspension components
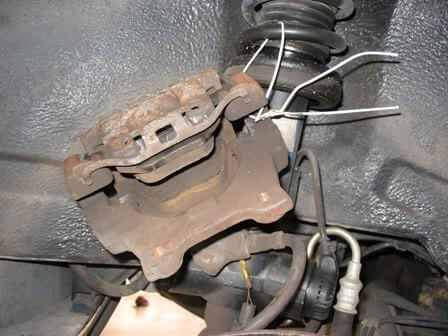
Remove the brake caliper and hang it from the strut using mechanics’ wire
1) Remove the brake caliper. Insert a wire and hang it on the strut spring. Do not let the brake caliper hang by the brake hose.
2) Remove the brake pads and note where they came from so you can put them back in the same place.
3) Loosen the axle nut, but don’t remove it yet. Axle nuts are held in place using one of three methods: staking, cotter pin, or “prevailing torque.”
How to remove a staked axle nut
In a staked nut setup, the CV axle shaft has a groove cut into it. Once the nut is torqued to spec, the assembler uses a chisel or pin punch to deform the lip of the nut by forcing it into the groove on the CV axle. That prevents the nut from loosening.
To remove a staked nut, place a small chisel or center punch between the slot and the staked portion. Tap the deformed portion away from the slot and then remove the nut. This nut should not be reused.
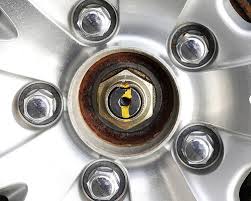
Notice the indentation on the top of the axle nut. This is where the nut was deformed into the slot to prevent it from loosening
Cotter key axle nut
An axle nut that’s held in place with a cotter pin uses  a castle nut with slots.
To remove, use a side cutters to grab ahold of the legs of the cotter key. Bend the legs back and then pull out the cotter key and loosen the castle nut.
How to remove a prevailing torque axle nut
A prevailing torque nut is deformed into a slightly oval shape during the manufacturing process. It takes a lot of torque to install, but less torque to remove. Loosen the nut using a breaker bar and then a ratchet. A prevailing torque nut can’t be reused.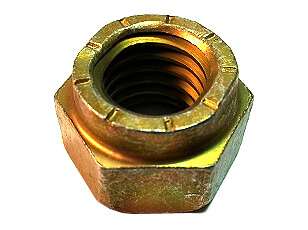
Disconnect a ball joint or the strut
Before you can remove the axle from the transmission, you have to remove the outer CV joint and splined portion from the steering knuckle. To do so, you’ll have to disconnect the knuckle from the ball joint or from the strut, whichever is easier.
Pop the inboard CV joint out of the transmission.
Most axle shafts are held in the transmission with a circlip. To disengage the click, use a pry bar and a snapping motion to pop the inner CV joint out of the transmission.
Steps to install the new axle shaft
1) Apply a light coating of grease around the circlip on the new axle. Coat the splines with a light film of the same grease. This will help the axle shaft slide into the transmission easier and that helps seat the circlip.
2) Align the inner CV joint splined shaft with the transmission and engage the splines. Then, using a quick slamming motion push the axle shaft into the transmission. The grease and quick motion will compress the circlip and allow it to seat.
3) Pull on the inner CV joint to ensure it’s fully seated.
4) Apply a light film of motor oil on the splines of the outer CV joint and insert the splines into the steering knuckle.
5) Reconnect the steering knuckle to the ball joint or strut and tighten ball joint to spec. If the strut has adjustable holes, snug up the strut bolts and then adjust the camber
6) Using the angle gauge, reset the camber to its original setting. Then tighten the strut bolts to spec
7) Place a screwdriver or pin punch in one fo the brake rotor vent slots and rotate the rotor so the punch is resting on the abutment. Then install the axle nut and torque to spec. Stake the axle nut or install the cotter pin as required.
Dos and Don’ts When Replacing an Axle Shaft
• NEVER use your torque wrench as a ratchet to loosen axle nuts. Sure, it gives you leverage, but it also knocks the torque wrench out of alignment.
• NEVER use an impact wrench to loosen an axle nut. The blows can damage the wheel bearing by chipping the chrome plating off the balls or rollers in the bearing.
• Use a long-handled ½” drive breaker bar to gain leverage to loosen the axle nut.
• Don’t loosen the axle nut while the vehicle is on the ground with the full vehicle weight on the wheel bearing. On many cars, that can damage the wheel bearing.
• The axle nut will require almost 200 ft/lbs of torque to remove, and the rotor must be blocked to prevent it from rotating. The easiest way to do that is to insert a hefty screwdriver into the rotor cooling vanes so it wedges against the brake caliper bracket and prevents the rotor from turning as you loosen the axle nut.
4) Remove the brake rotor. On some vehicles you may have to remove the brake caliper bracket in order to remove the brake rotor.
5) On many vehicles, you’ll have to disconnect the stabilizer bar end link 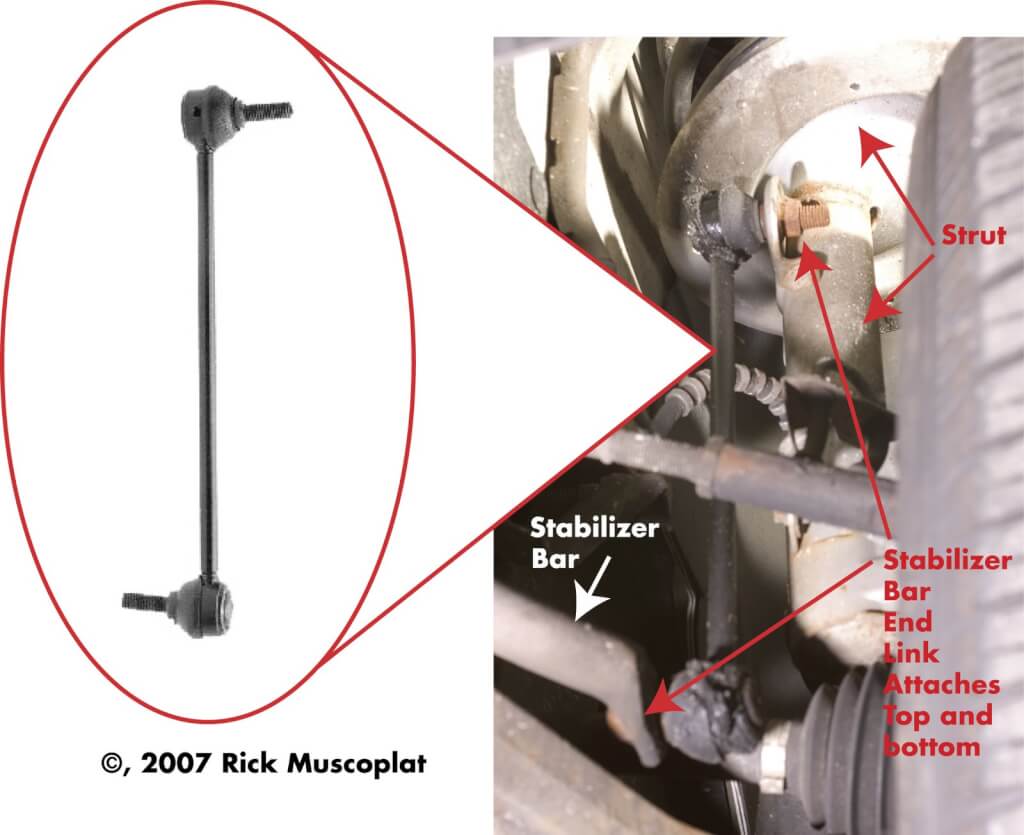 from either the stabilizer bar or the strut, whichever is easier to access. If the threads on the end link are rusted, or the end link is the ball and socket design where the ball spins in the socket while you turn the nut, look for a hex flat on the shaft. If it’s equipped with a hex flat, hold it with an open-end wrench. On other styles, the shaft end is designed to be held with a hex wrench. If you can’t remove the end link nut, cut it off with an air-powered cut-off wheel or a sawzall, or use a nutcracker. In many cases it’s simply easier to cut the shafts and replace the end link with new parts.
6) Remove the cotter pin and use a tie rod end separating tool to disconnect 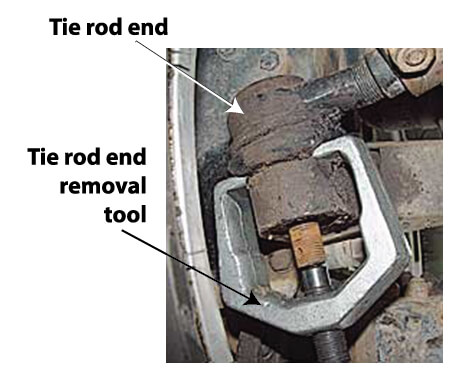 the outer tie rod end from the steering knuckle.
7) Depending on the vehicle and shop manual instructions, it may be necessary to disconnect the lower ball joint. They’re connected in one of two ways: cotter pin and castle nut, or friction clamp and through-bolt. If that’s the instruction in your shop manual, disconnect the fasteners and force the ball joint out of the steering knuckle using your pry bar. Then you can pivot the sheeting knuckle strut outwards (after removing the axle nut) to disconnect the splined portion of the cv axle from the wheel hub.
8) Remove theaxle nut and apply rust penetrant to the splines on the axle shaft. Use a rubber mallet to disengage the axle shaft from the wheel hub. If it’s stuck, screw on the axle nut so it’s flush with the axle threads and tap it with a large mallet to disengage the splines.
9) Remove the outer CV joint and axle shaft from the wheel hub.
10) Pop the inner cv joint out of the transmission.  NOTE: on some vehicles, the inner cv joint is held in place with a plate and bolts. Refer to your shop manual for the exact removal instructions.

Use an axle popper tool to quickly snap the inner CV joint out of the transmssion
If you have trouble prying the inner CV joint out of the transmission, rent a CV joint axle popper like this. Don’t use this tool as a pry bar; it’s designed to work more like a ball joint separator where you slide it behind the CV joint and strike the end of the tool so it slide behind the cv joint to force it out.
How long does it take to replace an axle shaft?
CV axle replacement shop labor usually takes about 1.5 hours per side. If you’ve never done this before or have trouble loosening the axle nut or disconnecting the ball joint or tie rod end, your cv axle replacement job make take much longer. Always work on one side at a time so you have the other side for reference. Cv axle replacement can be a big job for a DIYer, but it’s not a hard job. You just have to use the right tools and follow the steps in order.
©, 2016 Rick Muscoplat
Posted on by Rick Muscoplat