
Normal Pressures for 134a: The Only Guide You Need
How to Read Pressures for 134a Like a Pro
Quick Summary (What You Need to Know Fast)
When I check an R-134a system, I expect to see:
• Low-side pressure: ~27–32 psi under normal conditions, but can climb to 45–55 psi on hot days
• High-side pressure: roughly 2.2–2.5 × ambient temperature (°F)
• Readings must always be interpreted relative to ambient temperature and system conditions
If your normal pressures for 134a fall outside these ranges, it’s not random—there’s always a mechanical or airflow reason behind it.
Why Car AC Pressure Readings Matter More Than Anything Else
As an automotive AC expert, I’ll tell you this straight: gauges don’t lie—but they do require interpretation.
When I connect my manifold gauges, I’m not just looking at numbers. I’m reading system behavior. Pressure readings reveal:
• Refrigerant charge level
• Compressor performance/efficiency
• Condenser airflow problems
• Internal restrictions like clogged orifice tubes or expansion valves
Without understanding what normal 134a pressures are, you can easily misdiagnose a system and waste time (and money) replacing parts that aren’t faulty.
The Exact Conditions I Use to Check AC Pressures
Before I even look at the gauges, I make sure the system is tested under proper conditions. If you skip this, your readings are useless.
Here’s how I always set it up:
• Engine running at about 1,500 RPM
• AC set to MAX cooling
• Doors open or windows down (to prevent cycling)
• Blower on high speed
• Compressor fully engaged
And just as important—ambient temperature matters! AC pressure readings are directly tied to outside air temperature. Without that reference, your numbers mean nothing.
My Rule of Thumb for R-134a AC Pressure Readings
After years of diagnosing AC systems, I rely on a simple, reliable rule.
Low-Side Pressure
• Normal range: 27–32 psi under typical conditions (70–85°F)
• On hotter days: can rise to 45–55 psi
Why this matters:
At around 27 psi, R-134a refrigerant boils at about 32°F, which is exactly what I want. That’s how the evaporator produces cold air without freezing up.
• If the pressure drops too low, the evaporator can freeze.
• If it’s too high, you lose cooling performance.
High-Side Pressure
Here’s the formula I use every time:
• High-side pressure = 2.2 to 2.5 × ambient temperature (°F)
Example:
At 90°F ambient:
2.2 × 90 = 198 psi
2.5 × 90 = 225 psi
So I expect ~198–225 psi on the high side. This rule is one of the fastest ways to determine whether a system is operating normally.
Understanding What Abnormal Pressures for 134a Mean
This is where experience matters. The numbers don’t just tell you what is wrong—they tell you why.
Condition 1: Low-Side Pressures are Too Low, and High-Side Pressures are Too Low
Cause: Undercharged system — Due to a leak in the system or a mistake during charging
Why Low Refrigerant Causes Low Readings on Both Sides
The AC compressor’s job is to create a pressure differential — it draws low-pressure vapor from the evaporator and compresses it to a high-pressure vapor. Compressing the vapor increases its temperature, so it flows into the condenser, where it cools and condenses into a high-pressure liquid. So the system has low-pressure vapor before the compressor and high-pressure liquid coming into the evaporator.
If there isn’t enough refrigerant in the system, the compressor can’t build adequate pressure on either side.
The Low Side is Low Because: With less refrigerant in the system, there’s less liquid sitting in the evaporator waiting to boil off and create pressure. A properly charged system has liquid refrigerant actively boiling in the evaporator, which sustains low-side pressure. With insufficient refrigerant, the evaporator “starves” and pressure drops.
The High Side is Low Because: The compressor is pulling in less refrigerant vapor than it should (there simply isn’t enough), so even though it’s compressing what it has, the resulting high-side pressure is lower than normal. There’s not enough refrigerant mass flowing through to build up pressure.
Condition 2: Low-Side Pressure is Too Low, and The High-Side Pressure is Too High
Cause: Restriction in the System
This pattern points to a blockage or restriction somewhere in the system — most commonly a clogged expansion valve (TXV) or orifice tube.
Why This Condition Indicates a Restriction
Refrigerant flows from the Evaporator -> Compressor → Condenser → Expansion Device → Evaporator → back to Compressor. The expansion device (TXV or orifice tube) is the intentional restriction that separates the high- and low-side circuits. It meters refrigerant flow into the evaporator in a controlled way.
A normal restriction in the expansion valve/orifice produces a normal high-side reading. However, if the expansion valve or orifice tube is restricted beyond normal, pressure builds up behind the restriction and the High Side reads TOO HIGH:
In other words, the compressor is pumping refrigerant toward the restriction, but it can’t pass through the metering device quickly enough. It backs up and piles up on the high side, building excessive pressure — like traffic jamming up behind a bottleneck.
Why the Low Side reads TOO LOW: Because not enough refrigerant is making it past the restriction into the evaporator, and the low side of the evaporator is starved of refrigerant. The compressor starts pulling a vacuum on the low side as it removes the refrigerant faster than the restriction allows it to be replaced.
Condition 3: Low-Side Pressure is Too High, and The High-Side Pressure is Too High
Two Causes
Cause #1 Overcharged System
Why the High Side is Too High — The compressor is pumping excessive refrigerant into the high side. There’s simply too much refrigerant being compressed, so pressure builds beyond normal limits. The condenser gets flooded with more liquid refrigerant than it can store or handle.
Why the Low Side is Too High — With too much refrigerant in the system, the evaporator can also flood. Instead of receiving a fine mist of refrigerant from the expansion device, it gets slugs of liquid refrigerant that can’t boil off efficiently. This high-pressure liquid backing up in the evaporator raises the low-side pressure. The expansion device loses its ability to meter flow properly because there’s too much pressure pushing against it from both sides.
Cause #2 — Condenser Failure: A bad condenser produces almost identical readings
• Clogged/bent fins that prevent airflow from removing heat from the refrigerant
• Internal clogs that prevent adequate refrigerant flow<
• Condenser fan failure; not drawing enough air across the condenser
Why the High Side is Too High: If the condenser can’t shed heat — due to bent fins, a clogged core, a dead condenser fan, or debris blocking it — the refrigerant stays hot and remains in a gaseous state longer than it should. Hot gas occupies more volume and exerts higher pressure. The compressor keeps pushing refrigerant in, but the condenser can’t condense it fast enough, so the high-side pressure skyrockets.
Why the Low Side is Too High: Because the condenser isn’t properly condensing the refrigerant, what arrives at the expansion device is hot, partially condensed refrigerant instead of cool liquid. This refrigerant still carries excessive heat energy into the low side. When it expands in the evaporator, it doesn’t absorb heat as it should, causing the low-side pressure to rise.
Generally speaking, you want around 27-32 psi on the low side and 200 on the high side.
Car AC Pressure Chart by Temperature (My Go-To Reference)
When I’m diagnosing in the field, I often refer to a quick mental chart like this:
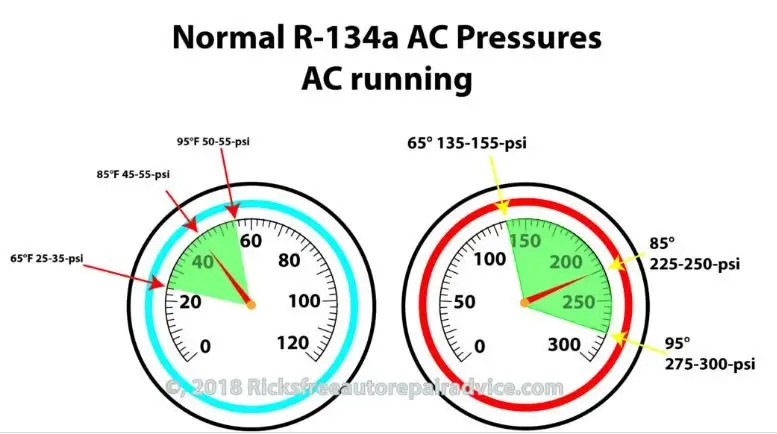
65°F: 25–35 psi low / 135–155 psi high
70°F: 35–40 psi low / 145–160 psi high
75°F: 35–45 psi low / 150–170 psi high
80°F: 40–50 psi low / 175–210 psi high
85°F: 45–55 psi low / 225–250 psi high
90°F: 45–55 psi low / 250–270 psi high
95°F+: 50–55 psi low / 275–300+ psi high
This isn’t just theory—this is what I see in real-world systems that are working correctly.
What Normal AC Pressures Actually Tell Me
When both sides fall into expected ranges, I know:
• The refrigerant charge is likely correct
• The compressor is doing its job
• The expansion device is regulating flow properly
• Airflow across the condenser is adequate
But when pressures deviate, that’s where real diagnosis begins.
Quick Tip:
If the high side is running higher than this, check the airflow over the condenser first. Blocked condensers are one of the most common causes of pressure issues that fall outside car AC normal pressure readings.
What Abnormal AC Pressure Readings Mean (My Diagnostic Approach)
This is where experience matters. I don’t just look at numbers—I compare patterns.
• Low Pressure on Both Sides
This usually means:
• Low refrigerant charge (leak)
• The system is underfilled
• Bad compressor (low high-side pressure)
• Clogged orifice tube/expansion valve (low low-side, high high-side)
• Condenser airflow restriction (high high-side pressure)
What I do: Check for leaks before adding refrigerant—always.
• High Pressure on Both Sides
This points to:
• Overcharged system
• Possible air contamination
What I do: Recover and recharge properly—don’t guess.
Low Low-Side / High High-Side
This is a classic restriction pattern:
• Clogged orifice tube or expansion valve
What I do: Inspect for debris and replace the restriction.
Low High-Side Pressure
This usually means:
• Weak or failing compressor
What I do: Confirm compressor output before replacing anything else.
High High-Side Pressure
One of the most common problems I see:
• Poor condenser airflow
Causes include:
• Cooling fan failure
• Blocked condenser fins
• Debris buildup
What I always check first: airflow. It’s often the simplest fix.
The Most Overlooked Factor: Airflow
I can’t stress this enough—airflow over the condenser is critical.
If the condenser can’t reject heat:
• High-side pressure skyrockets
• Cooling performance drops
• Compressor strain increases
Before you assume a refrigerant issue, always check:
• Radiator fans
• Condenser cleanliness
• Airflow obstructions
My Expert Take: Don’t Diagnose Blind
Here’s the bottom line based on decades of experience:
• Pressure readings are your primary diagnostic tool
• But they only work if you understand what they mean
• Always consider temperature, airflow, and system conditions
If you’re just adding refrigerant without checking pressures, you’re not fixing the problem—you’re guessing.
Final Thoughts: How I Approach Every AC Diagnosis
Every time I diagnose a car AC system, I follow the same mindset:
• Verify operating conditions
• Compare pressures to ambient temperature
• Look for patterns—not just numbers
• Confirm the root cause before replacing parts
That’s how you diagnose AC systems accurately—and avoid costly mistakes.
I highly recommend checking out my full guide on diagnosing abnormal AC pressure readings to pinpoint the issue quickly. See this article on abnormal pressure readings and the most common causes.
© 2019 Rick Muscoplat
Posted on by Rick Muscoplat