
Rebuilding an Alternator: The Complete DIY Step-by-Step Guide
Rebuilding an Alternator vs. Buying a Remanufactured Alternator
Quick Summary
Most alternator problems are due to:
1) Failed diodes or rectifier
2) Failed voltage regulator
3) Worn brushes or slip rings
4) Worn bearings
• These are easily replaceable items. However, before considering a rebuild, always diagnose the charging system before removing the alternator. A badly corroded battery cable, ground, belt, or connection can imitate alternator failure.
• Inspect the rotor, stator, housing, and slip rings before spending money on rebuild parts.
• Never hammer new bearings into place. Use the correct puller, press, or bearing installation tools.
• Take photos and mark the housing before disassembly. Those few seconds can save a lot of frustration during reassembly.
• Test the rebuilt alternator before declaring the repair successful.
• If the windings, rotor, stator, or housing are badly damaged, replacing the alternator may make more financial sense.
I’ve learned that rebuilding an alternator isn’t about throwing a handful of new parts into an old housing. A successful rebuild starts with diagnosis and ends with testing. Everything between those two points is careful mechanical and electrical work.
Understanding Your Car’s Alternator
Why I Consider Rebuilding an Alternator Before Replacing It
When an alternator quits charging, most people immediately start shopping for another one. I don’t.
My first question is: What actually failed?
An alternator contains several components, but that doesn’t mean they’re all worn out just because the unit stopped charging.
The rotor and stator may still be perfectly serviceable. The aluminum housings may have decades of life remaining. Sometimes the failure comes down to a relatively inexpensive voltage regulator, worn brushes, a bad bearing, or a failed rectifier.
That’s why I don’t automatically condemn an original OEM alternator.
If I’ve got a good housing, healthy windings, a usable rotor, and rebuild parts are readily available, rebuilding the original alternator can be an excellent option.
But I make that decision only after inspecting and testing it.
What Usually Fails Inside an Alternator?
After you’ve worked with enough alternators, certain failures start looking familiar.
1. Worn Alternator Brushes — Brushes are wear items. 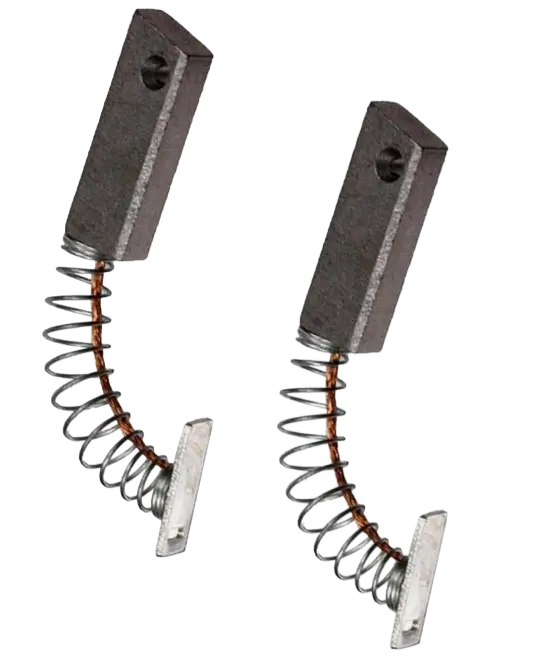 They maintain contact with the spinning rotor’s slip rings, so they gradually become shorter. Eventually, they may no longer maintain reliable electrical contact.
Possible symptoms include:
• Intermittent charging
• Battery warning light
• Charging that changes unexpectedly with RPM
• No alternator output
• Charging that comes and goes with vibration
Some alternators use a replaceable brush holder, while others integrate the brushes into the voltage regulator assembly.
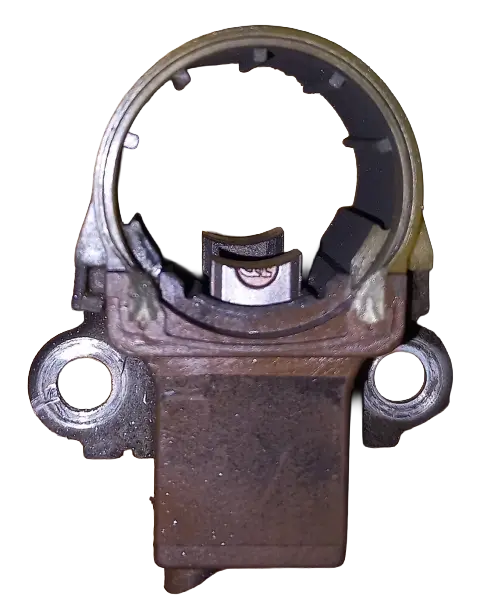
Worn brushes inside a brush holder
2. Worn Alternator Bearings— A bearing problem usually announces itself mechanically rather than electrically. A failing alternator bearing may produce:
• Whining
• Growling
• Grinding
• Roughness when the pulley is turned by hand
• Excessive shaft play
Don’t automatically blame every underhood whine on an alternator bearing, though. Belt tensioners, idler pulleys, water pumps, and A/C compressor bearings can produce similar noises.
How alternator bearings fail:
Failed grease seal: The grease seal keeps the grease in and water out. When it fails, the grease leaks out and water enters, rusting the bearings and causing total failure.
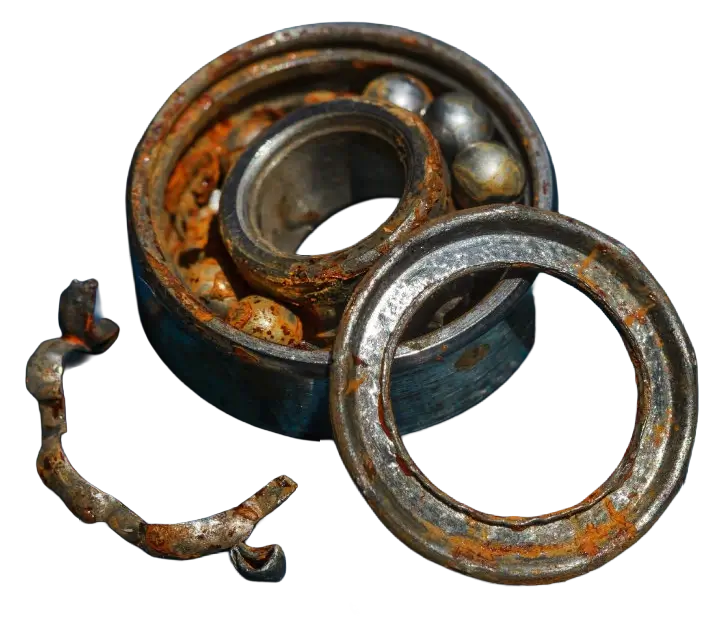
3. Failed Voltage Regulator — A failed voltage regulator can create symptoms that look much more dramatic. Depending on the design and failure mode, you may encounter:
• Undercharging
• Overcharging
• Unstable system voltage
• Battery warning lights
• Charging-system trouble codes
If I’m rebuilding an alternator with an internally mounted regulator and a quality replacement is available, replacing the regulator while I’m already inside the unit often makes sense.
4. Failed Rectifier Diodes — The rectifier converts  the alternator’s AC output into DC electricity. When a diode fails, you may experience weak charging, abnormal AC ripple, electrical problems, or a battery that seems to discharge for no obvious reason. A multimeter with a diode-test function is extremely useful here.
How to Test an Alternator Diode or Rectifier Bridge With a Multimeter
A) Set the multimeter to diode-test mode. If your meter doesn’t have a diode setting, use the lowest resistance range.
B) Isolate the rectifier if possible. Disconnect it from the stator and other alternator components, so you aren’t measuring through another circuit.
C) Place the meter leads across the diode. Touch the red probe to one side of the diode and the black probe to the other. Note the reading. A good silicon diode will typically show a forward-voltage drop of roughly 0.4 to 0.7 volts, depending on the diode and meter.
D) Reverse the probes. Swap the red and black leads and test the diode again.
E) Compare both readings. A good diode should conduct in one direction only. The reverse direction should normally display OL, infinity, or another indication of no continuity.
Repeat the test for every diode in the rectifier bridge. A diode that conducts in both directions is likely shorted. A diode that shows no conduction in either direction is likely open.
When testing an alternator rectifier bridge, remember that you’re testing the individual diodes within the assembly. Because rectifier designs vary, always confirm the correct test points and expected readings for the specific alternator you’re rebuilding.
5. Damaged Slip Rings — The brushes ride directly against the rotor’s slip rings. Some surface wear is normal. Deep grooves, heavy pitting, severe scoring, or badly worn rings deserve closer attention. Installing brand-new brushes against badly damaged slip rings isn’t my idea of a rebuild. It’s a shortcut.
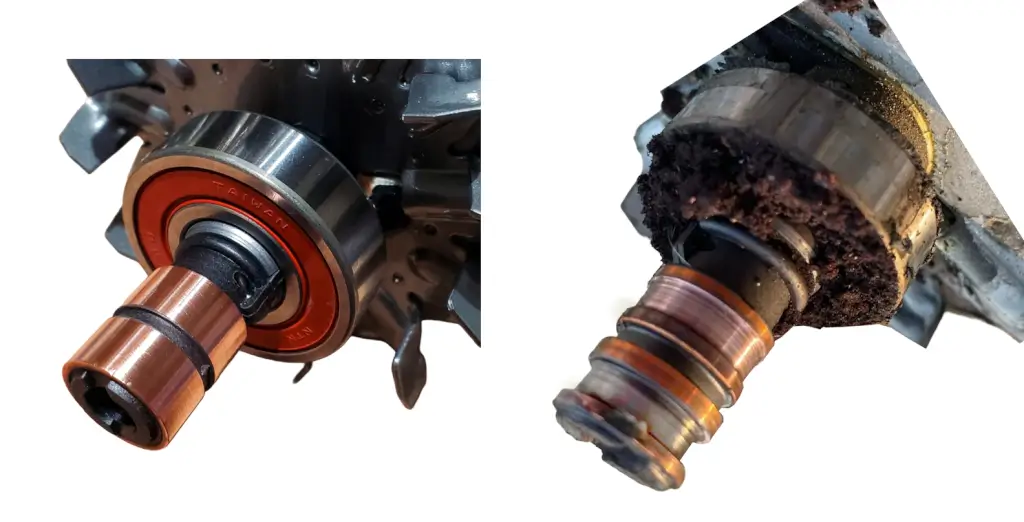
Notice the grooves on the slip rings. The rings must be replaced before considering this a rebuildable alternator
6. Rotor or Stator Damage — This is where I start reconsidering the entire project. Burned windings, shorted windings, obvious overheating, damaged insulation, or major rotor/stator problems can turn a simple DIY alternator rebuild into a much more involved electrical repair.
At that point, compare the cost and effort of repairing the core against buying a quality replacement.
Tools I Recommend for a DIY Alternator Rebuild
You don’t need an industrial alternator rebuilding shop, but you do need more than a socket set.
Before I start, I like to have:
• Digital multimeter with diode-test capability
• Socket and wrench set
• Screwdrivers
• Torque wrench
• Bearing puller
• Bearing press or suitable installation tools
• Pulley removal tools
• Snap-ring pliers where required
• Quality soldering equipment if the design requires soldering
• Rosin-core electrical solder appropriate for the repair
• Electrical contact cleaner
• Small picks and pliers
• Paint marker
• Parts trays or labeled containers
• Safety glasses
• Vehicle-specific service information
• Correct alternator rebuild kit
• One additional tool is worth mentioning: your phone camera — I photograph the terminal arrangement, insulators, regulator position, wire routing, housing orientation, and anything else I might question later. Those pictures cost nothing and can be more useful than a memory that’s several hours old.
Step-by-Step: How I Approach Rebuilding an Alternator
Step 1: Diagnose the Charging System Before Removing Anything — This is one of the most important alternator rebuilding tips I can give you. Don’t rebuild an alternator simply because the battery keeps going dead.
Before removing it, check:
• Battery condition
• Battery terminal condition
• Positive charging cable
• Engine and chassis grounds
• Serpentine or drive belt
• Belt tensioner
• Alternator electrical connector
• Fusible links or charging-system fuses
• Charging voltage
• Voltage drop across major charging connections
A weak battery can fool you. So can a poor ground. I want evidence pointing toward the alternator before I put it on my workbench.
Charging voltages vary by vehicle, temperature, battery condition, load, and especially on computer-controlled charging systems. Always compare your measurements with the manufacturer’s specifications rather than treating one universal voltage number as correct for every vehicle.
Step 2: Disconnect the Battery — Before touching the alternator’s electrical connections, disconnect the battery according to the vehicle manufacturer’s procedure.
The alternator’s main output terminal is connected to a high-current circuit. Accidentally grounding it with a wrench isn’t the kind of excitement you want during a Saturday repair.
Step 3: Remove the Alternator — Release belt tension and remove the drive belt from the alternator pulley. Before disconnecting electrical connectors, take pictures. Then remove the alternator mounting bolts and work the alternator out of the engine compartment.
Some vehicles give you acres of room. Others make alternator removal feel like a puzzle designed by somebody with a personal grudge against mechanics.
Step 4: Identify the Alternator Before Ordering Parts — This is a commonly overlooked step. Don’t rely entirely on year, make, model, and engine size when buying an alternator repair kit.
A vehicle may have been equipped with different alternator manufacturers or amperage ratings. Previous repairs may also mean the alternator currently on the car isn’t the same version it left the factory with.
Look for the manufacturer’s label, model number, amperage rating, and identification numbers.
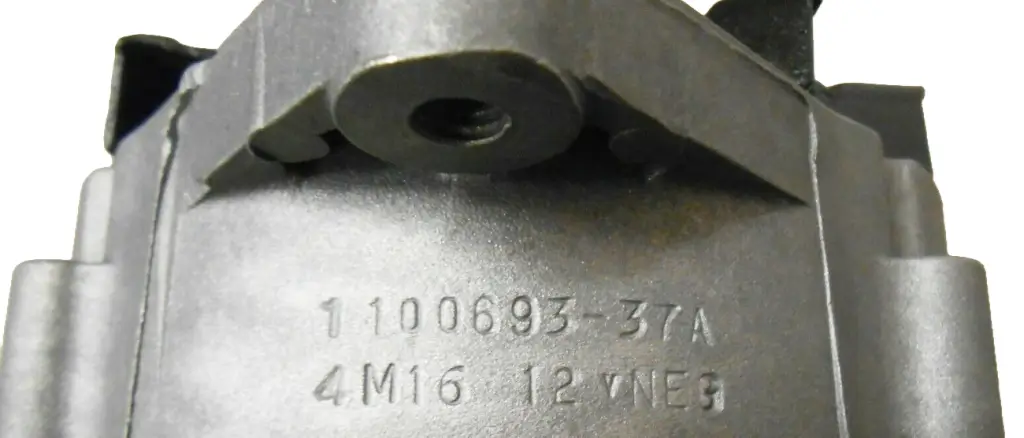
Match the rebuild components to the alternator itself whenever possible.
Step 5: Mark the Alternator Housing — Before separating anything, I put alignment marks across the housing halves. This preserves the original “clocking” of the alternator.
Getting the housing orientation wrong can put the electrical terminals or mounting points in the wrong position when you reinstall it.
Step 6: Remove the Alternator Pulley — Pulley removal varies by alternator design. A conventional pulley may require one procedure, while an overrunning alternator pulley or overrunning alternator decoupler may require special tools.
Don’t clamp delicate components or improvise a destructive holding method just to get the nut loose.
If you’re dealing with an overrunning pulley, determine whether the pulley itself is worn before reusing it.
Step 7: Split the Alternator Housing Carefully — Remove the long through-bolts holding the housing together. Then separate the housing halves carefully. This is one of those moments where force gets expensive.
The housing is aluminum, and the stator windings and electrical connections inside are much less tolerant of prying than they appear. I work gradually and pay attention to what is still attached before pulling anything apart.
Inspect Before You Install the Alternator Rebuild Kit
Once the alternator is open, resist the temptation to install shiny new parts immediately.
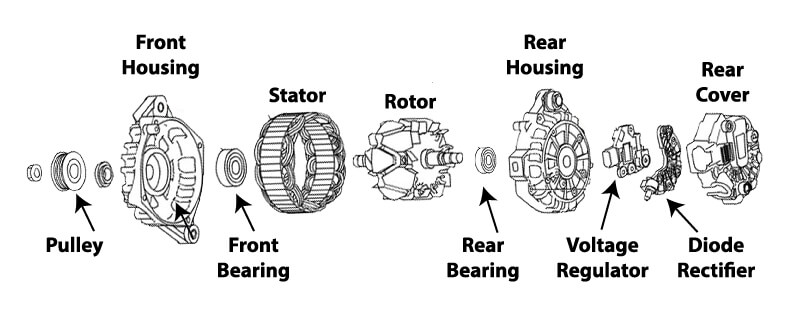
Exploded view of car alternator showing voltage regulator, diode rectifier, front and rear alternator bearings, alternator rotor and stator, and housings
First, inspect the core. I look closely at:
• Rotor — Inspect the shaft, slip rings, and winding condition. Look for overheating, scoring, mechanical damage, and abnormal wear.
• Stator — Look for:
• Burned windings
• Darkened or overheated insulation
• Damaged leads
• Broken connections
• Evidence of contact between the rotor and stator
• Slip Rings — Light wear is one thing. Deep grooves and severe scoring are another. New brushes need a suitable surface to ride against.
• Bearings — Turn them by hand and feel for:
• Roughness
• Binding
• Noise
• Looseness
• Excessive play
• Rectifier — Use the proper test procedure for the specific assembly and your multimeter.
A diode should conduct in the intended direction and block current in the opposite direction. Exact procedures vary with rectifier design, so consult the service information for the alternator you’re rebuilding.
• Voltage Regulator and Brushes — Inspect brush length, spring operation, connections, and heat damage. If the regulator and brush holder are one assembly, replacing the complete assembly may be preferable to trying to save an aging regulator.
Installing New Alternator Bearings Correctly
Bearings are where a perfectly good DIY rebuild can go wrong in seconds.
The rule is simple: Don’t transfer installation force through the bearing’s balls or rollers. If you’re pressing a bearing into a housing, apply force to the appropriate race for that installation. If you’re pressing a bearing onto a shaft, support and drive the correct race. Don’t hammer indiscriminately on a new bearing.
A bearing can be damaged during installation and still feel acceptable initially. Then, a few thousand miles later, the “new” alternator starts whining. That’s not a defective rebuild kit. That’s an installation failure.
Replacing Alternator Brushes and the Voltage Regulator
Brush replacement ranges from remarkably simple to mildly aggravating depending on the alternator. Some brush holders are easy to replace as an assembly. Others require soldering.
Before installing them:
• Verify the replacement brushes fit correctly.
• Make sure each brush moves freely in its holder.
• Check the springs.
• Verify all electrical connections.
• Follow the manufacturer’s procedure for retracting the brushes during assembly.
Many designs provide a hole through which a small retaining pin or wire can hold the brushes back while the rotor and housing are assembled. Don’t forget to release the brushes afterward. It’s a small detail that can cause a big “Why isn’t this thing charging?” moment.
Replacing the Alternator Rectifier or Diodes
Rectifier work deserves patience.
Electrical components don’t appreciate excessive soldering heat, and neither do nearby plastic insulators.
If the rectifier is replaceable as an assembly, I generally prefer a high-quality complete replacement over improvising individual diode repairs unless I’m dealing with an alternator specifically worth restoring at the component level.
Pay close attention to:
• Terminal insulators
• Washers
• Electrical isolation points
• Stator connections
• Heat sinks
• Fastener positions
One incorrectly installed insulator can turn a successful rebuild into an electrical short.
Reassembling a Rebuilt Alternator
This is where all those photos and alignment marks pay for themselves.
I reassemble slowly and verify each step rather than assuming everything will sort itself out when the bolts tighten.
Before finishing, I check that:
• The rotor spins freely.
• Bearings are fully and correctly seated.
• Stator wires aren’t pinched.
• Terminal insulators are correctly positioned.
• Brushes are correctly installed and released.
• The rectifier and regulator connections are secure.
• Housing alignment marks match.
• Pulley hardware is tightened to the correct specification.
• Housing fasteners are tightened appropriately.
I never use the housing bolts to force badly misaligned components together. If the case doesn’t want to seat properly, I stop and find out why.
Testing a Rebuilt Alternator Before and After Installation
A rebuild isn’t finished when the last bolt goes in. It’s finished when the alternator passes testing.
A professional alternator bench tester is ideal because it can evaluate the unit under controlled conditions.
For the DIYer, electrical tests with a quality multimeter can still reveal a great deal.
After installation, I verify:
• Charging-system operation
• Voltage at the battery
• Voltage under electrical load
• Battery warning-light operation
• Belt tracking
• Abnormal bearing noise
• Electrical connection temperature where appropriate
• Charging-circuit voltage drop if performance is questionable
On vehicles with computer-controlled charging systems, I follow manufacturer specifications and scan-tool procedures rather than expecting voltage to remain at one fixed number.
Common Alternator Rebuilding Mistakes I Avoid
I’ve found that many DIY alternator rebuild failures aren’t really parts failures. They’re process failures.
The mistakes worth avoiding include:
• Ordering a kit by vehicle instead of verifying the alternator identification
• Rebuilding before confirming the alternator is actually defective
• Forgetting to mark housing alignment
• Mixing up fasteners
• Losing insulating washers
• Damaging stator windings during disassembly
• Hammering bearings into place
• Pressing against the wrong bearing race
• Overheating electrical components while soldering
• Installing new brushes on severely damaged slip rings
• Forgetting to release retained brushes
• Reusing a questionable overrunning pulley
• Pinching wires during reassembly
• Failing to torque pulley hardware correctly
• Skipping the final charging-system test
A careful rebuild is rarely about speed. It’s about eliminating opportunities for failure.
How to Choose the Best Alternator Rebuild Kit
Not every alternator rebuild kit is equal. A low price doesn’t impress me if I have to remove the alternator again three months later.
I pay attention to:
• Bearing manufacturer
• Regulator compatibility
• Brush quality
• Rectifier quality
• Exact alternator model compatibility
• Manufacturer or supplier reputation
• Included hardware
• Country of manufacture when available
• Warranty and return policy
Some kits contain only bearings and brushes. Others include the regulator, rectifier, slip rings, or additional hardware.
Is Rebuilding an Alternator Worth It?
Sometimes absolutely. Sometimes absolutely not. That’s why I don’t make this decision based solely on the price of a rebuild kit.
When I Would Rebuild an Alternator
Rebuilding makes the most sense when:
• The original OEM alternator is worth keeping.
• The housing is undamaged.
• Rotor and stator test good.
• Quality replacement components are available.
• The problem is isolated to normal wear components.
• I already own the necessary tools.
• Replacement alternators are expensive or difficult to find.
• I’m restoring an older or unusual vehicle.
• Downtime isn’t a major concern.
• When I Would Replace the Alternator
Replacement starts looking better when:
• Windings are badly burned.
• The rotor or stator is seriously damaged.
• The housing is cracked.
• Multiple expensive internal components have failed.
• Correct rebuild parts are difficult to obtain.
• I don’t have the tools required to do the job correctly.
• The vehicle needs to be back on the road immediately.
• A quality new or remanufactured alternator offers better overall value and warranty coverage.
• Rebuilding an Alternator vs. Buying Remanufactured
A remanufactured alternator has one enormous advantage: convenience. You remove the old alternator, install the replacement, return the core if required, and move on.
The disadvantage is that remanufacturing quality varies.
With a DIY rebuild, I know exactly which parts went into the alternator. I can select the bearings, regulator, brushes, and rectifier rather than relying on somebody else’s rebuilding standards.
But that control comes at a price: my time.
A DIY alternator rebuild can also require tools that don’t make economic sense to purchase for a one-time repair.
So I compare the total job, not just the parts price.
How Much Does It Cost to Rebuild an Alternator?
There’s no single useful price for every alternator. The cost depends heavily on what you’re replacing.
A basic repair involving brushes may be inexpensive. Adding premium bearings, a voltage regulator, rectifier, slip rings, or pulley can increase the total quickly.
Your real DIY cost should include:
Rebuild parts + specialty tools + supplies + your time
Then compare that number against:
New alternator price + warranty
and Remanufactured alternator price + warranty
That comparison gives you a much more realistic answer than simply saying, “The rebuild kit only costs X dollars.”
FAQ: Rebuilding an Alternator
Can You Rebuild an Alternator Yourself?
Yes, many alternators can be rebuilt by an experienced DIYer with good mechanical skills, electrical-testing knowledge, the correct tools, and vehicle-specific service information.
It’s more advanced than replacing an alternator, but it isn’t beyond the reach of a careful home mechanic.
What Parts Do You Replace When Rebuilding an Alternator?
Common replacement components include:
• Brushes
• Brush holder
• Front bearing
• Rear bearing
• Voltage regulator
• Rectifier/diode assembly
• Slip rings
• Pulley when necessary
The rotor and stator should be tested rather than automatically replaced.
Is It Cheaper to Rebuild or Replace an Alternator?
A DIY rebuild can be cheaper when only common wear components have failed, and you already own the necessary tools.
The economics become less attractive when the rotor, stator, pulley, rectifier, and regulator all require replacement or you need to purchase several specialty tools.
How Long Does It Take to Rebuild an Alternator?
For an experienced person with the correct tools, the alternator itself may be relatively straightforward. A first-time DIY rebuild can take several hours, especially when bearing removal, soldering, pulley work, or troubleshooting is required.
Vehicle access also matters. Sometimes removing and reinstalling the alternator takes longer than rebuilding it.
Can I Replace Only the Alternator Brushes?
Sometimes.
If the bearings, slip rings, regulator, rectifier, rotor, and stator are healthy and the brushes are the confirmed failure, brush replacement may restore normal operation.
Don’t assume worn brushes are the only problem without testing the rest of the unit.
Do I Need to Replace the Voltage Regulator During an Alternator Rebuild?
Not universally, but I strongly consider it when the regulator is internal, has significant age or mileage, or comes integrated with the new brush holder.
Always use a regulator specifically compatible with the alternator and vehicle charging strategy.
Can a Bad Alternator Drain a Battery While the Car Is Off?
Yes. Certain internal electrical failures, including some rectifier diode failures, can contribute to a parasitic battery drain. However, many other vehicle circuits can cause the same symptom, so parasitic-draw testing is necessary before blaming the alternator.
Can You Rebuild a Modern Computer-Controlled Alternator?
The mechanical components may still be serviceable, but diagnosis is more complicated. Modern charging systems can use ECU-controlled output strategies and communication circuits.
Consult manufacturer service information before treating changing charging voltage as evidence of alternator failure.
My Final Take on Rebuilding an Alternator
After years of working around automotive electrical systems, I’ve learned not to confuse “failed alternator” with “everything inside the alternator is ruined.”
They’re two very different things.
Sometimes you’re looking at a perfectly good OEM alternator with worn brushes and bearings. In that situation, rebuilding an alternator can preserve a quality original component, save money, and give you control over every replacement part.
Other times, you open the housing and find cooked windings, badly damaged slip rings, a questionable rotor, and several other problems waiting for your wallet.
That’s when I put the tools down and start comparing replacement alternators.
The best alternator rebuild isn’t necessarily the one that saves the most money. It’s the one you diagnose correctly, rebuild with quality components, assemble carefully, and verify with proper testing.

Sources for Alternator Rebuild Kits
Lots of companies sell alternator rebuild kits, but many of the cheaper kits contain low-quality bearings and incompatible voltage regulators. Please don’t buy alternator rebuild kits from places like Amazon. Instead, buy from reputable sellers like the ones listed below.
maniacelectricmotors.com
aspwholesale.com
dahkee.com
Is Rebuilding an Alternator Worth It?
When the core is good and you have the tools, I’m a strong believer in rebuilding. A rebuild-alternator job typically costs $20–$50 in parts, versus hundreds for a replacement. You keep your original OEM housing and control exactly which alternator parts are replaced. The trade-off is time, effort, and the lack of a store warranty.
For a daily driver where downtime isn’t an option, a new alternator can make sense. But when I want durability and value, I’ll rebuild an alternator myself every time.
©, 2025 Rick Muscoplat
Posted on by Rick Muscoplat