
Test for Head Gasket Leak: Step-by-Step Guide
A Step-by-Step Guide To Test for a Head Gasket Leak
I’ve diagnosed plenty of head gasket failures over the years, and I can tell you one thing—ignoring the early signs of a failing gasket can cost you thousands of dollars. A blown head gasket can cause overheating, coolant loss, and even catastrophic engine failure if you don’t catch it in time. That’s why knowing how to test for a head gasket leak is critical if you suspect a head gasket failure.
In this guide, I’ll show you exactly how to test for a head gasket leak using multiple proven methods. Whether you’re a DIYer or a professional, these tests will help you confirm whether your engine is sealing properly—or if it’s time to start planning for repairs.
I’ve written an article on the most common signs of a head gasket leak. Find it here. Knowing the signs is great, but that’s not proof. Don’t dive into a head gasket replacement before actually confirming the failure. Here are the most effective ways to check for a head gasket leak.
1) Check the dipstick— A Chocolate Milk Appearance Is A Sign of A Head Gasket Failure
• Pull out the oil dipstick and check for a creamy, chocolate milkshake-like consistency.
• Open the oil filler cap and inspect the underside for the same milky residue.
If you see this, stop driving immediately—coolant-contaminated oil will destroy your engine bearings fast.
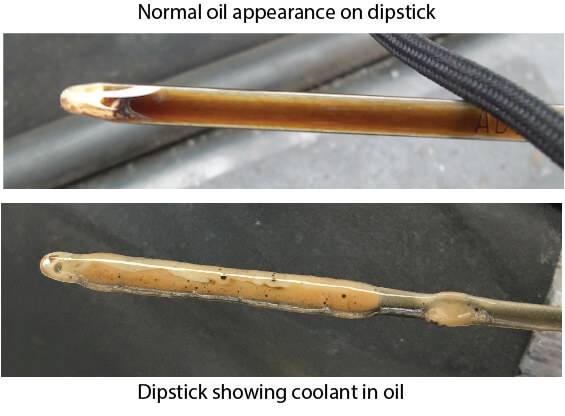
The top image shows normal oil on the dipstick. The bottom image shows a brown creamy oil/coolant combination caused by a head gasket failure.
A chocolate milkshake or creamy yellowish appearance on your dipstick is proof that your head gasket has failed between an oil port and a coolant port.
2) Test For A Head Gasket Leak Using a Combustion Gas Test Kit
When a head gasket fails between a coolant passage and the cylinder, the engine can pump combustion gasses into the coolant. That causes the engine to overheat quickly. It also causes bubbling and overflow in the coolant reservoir tank.
A chemical block tester, also known as a combustion gas leak tester, can detect exhaust gases in the coolant. This tool uses a special liquid that changes color when it comes into contact with combustion gases. To perform the test, remove the radiator cap (when the engine is cold), insert the tester, and run the engine. If the liquid changes color, it indicates a head gasket leak.
You can buy or rent a combustion gas tester (also called a block tester) to check for combustion gases in your coolant.

Block Tester BT-500 Head Gasket Combustion Leak Test Kit
Here’s the test procedure.
1) Start the engine and warm it up. The engine must be at operating temperature for the test. Ensure that the thermostat is open and coolant flows before you begin testing.
2) Remove some coolant from the radiator using a suction device, not the tester itself. You must have 2″-3″ of dead air space between the coolant and the tester. You don’t want to suck any coolant into the tester.
3) Pour the blue fluid into the tester and fill to the line on the glass.
4) Insert the tool’s bottom portion into the radiator’s neck.
5) Squeeze and release the suction bulb to pull air, not coolant, into the tester.
6) Fill the tester unit with the testing fluid. Press the rubber nozzle into the neck of your radiator and use the suction bulb to suck air, not coolant, into the tester. Coolant contaminates the test fluid. If you get any coolant into the tester, stop the test. Clean out the tester and add fresh fluid before trying again.
7) View the test fluid. If it turns YELLOW, there’s combustion gas present in the coolant and that’s proof of a head gasket leak.
NOTE: The test fluid has a shelf life. It must be used within one year. Store the fluid out of direct sunlight.
3) Check for a head gasket leak by checking for coolant in the cylinders
You might have a head gasket leak if you see billows of white smoke from the tailpipe. You can perform a compression or cylinder leak-down test to find out which engine bank leaks. However, pulling the spark plugs and performing this test is faster and easier.
How to conduct the test
1) Wait until the engine is cold
2) Remove all the ignition coils and spark plugs from the engine
3) Remove the fuse to the fuel pump(s) and ignition system
4) Place clean white cloths over the spark plug holes
5) Crank the engine.
If coolant is present in the cylinders, it will spit the coolant onto the rag, pinpointing the problem cylinder.
4) Perform a compression test to check for a head gasket leak b
1) Warm the engine
2) Remove all the ignition coils and spark plugs from the engine
3) Remove the fuse to the fuel pump(s) and ignition system
4) Install a compression gauge into one cylinder at a time
5) Crank the engine and record the pressure for each cylinder.
5) Use a Leak-Down Tester To Pinpoint a Head Gasket Failure
A more advanced method to test for a head gasket leak is a leak-down test. This test uses compressed air to check for sealing issues in the combustion chamber.
1) Remove the spark plugs and rotate the engine to put the suspected cylinder at top dead center (TDC) on the compression stroke.
2) Connect a leak-down tester and apply air pressure.
3) Listen for air escaping:
4) Hissing in the radiator indicates a leak between the cylinder and a coolant passage.
5) Hissing with the oil fill cap removed indicates a leak between the cylinder and an oil passage.
6) Air from the exhaust indicates a leak between the cylinder and an exhaust valve.
7) Air from the intake? Intake valve issue.
Should you try a head gasket sealer?
I regularly see auto forum users ask if the head gasket sealer works. The answer is a firm maybe. The older head gasket sealers worked by plugging the leak with wood pulp products. Those products only work on a head gasket leak between a cooling passage and an oil passage, and even then, they don’t work for very long. The newer head gasket sealers solidify a polymer into the gap using the engine’s heat. They can sometimes stop a small head gasket leak between the combustion chamber and a cooling passage. But it’s usually not a permanent fix.
There’s a big risk in using a head gasket sealer
The biggest issue in using a head gasket sealer is the potential for causing even more engine damage when the temporary repair fails (and it will fail). Let’s say you’ve got a small leak that’s sending some coolant into the oil, and you try a head gasket sealer. When the sealer fails, the leak could dumps lots of coolant into the crankcase to the point where your bearings fail. Instead of a $2,000 head gasket repair, you’re looking at a $4,000 engine replacement.
Which head gasket sealer works?
There’s lots of money to be made by manufacturing head gasket sealers. You  simply price your product high and claim that it works better than all the others. Based on multiple online comments, it seems that Bars and Blue Devil have the lowest success rates.
Both Bar’s Leaks and Blue Devil products offer a money-back guarantee, but Bar’s Leaks seems to require you to jump through incredible hoops to get your money back. Apparently, Bar’s Leaks requires you to get a signed statement from your mechanic that the vehicle has a head gasket leak and their product didn’t fix it. That’s a lot to go through to get less than $20 back. The shop will charge far more than that to conduct the head gasket leak test, to which you already know the results.
Users of K&W and K-Seal report the best results, although those reports are based on short-term use. I haven’t seen any long-term success stories from either product. But I have to note that I haven’t used any of these products myself. I’m only reporting what I see online.
©, 2016 Rick Muscoplat
Posted on by Rick Muscoplat