
Troubleshooting a Chevrolet Cruze U0100 Code
Understanding the Chevrolet Cruze U0100 Code: Causes and Solutions
The U0100 diagnostic trouble code (DTC) is a common issue that many Chevrolet Cruze owners may encounter. This code, which reads “Lost Communication with ECM/PCM ‘A’,” indicates a communication breakdown between the Engine Control Module (ECM) or Powertrain Control Module (PCM) and other vehicle systems. In simpler terms, the ECM or PCM is the brain of your car, controlling various engine and transmission functions. When it fails to communicate with other modules, it triggers the U0100 code, which can lead to a range of performance problems. You may also find a U0101 code as well. This article will delve into the primary causes of this code, how it affects your vehicle, and the steps to resolve it.
Several GM vehicles are having issues with the digital CAN bus data lines. GM has issued a service bulletin #17-NA-211 with tips on how to find the problem in the vehicles listed below. The problem appears as a Chevrolet Cruze U0100 code along with a no crank, no start condition and possibly a U0101 code.
U0100 Lost Communication With Engine Control Module
U0101 Lost Communication With Transmission Control Module
Vehicles affected by service bulletin #17-NA-211
Buick
Allure 2010-11
Cascada 2016-18
Encore 2013 2018
LaCrosse 2010 2016
Regal 2011 2017
Verano 2012 2017
Chevrolet
Cruze 2011 20
Equinox 2010 2017
Malibu 2008 2018
Orlando 2012 2017
Sonic 2012 2018
Trax 2013 2018
GMC Terrain 2010 2018
Pontiac G6 2010 2010
Saturn Aura 2009 2009
Step-by-step guide to diagnose and fix a Chevrolet Cruze U0100 code and a U0101 code
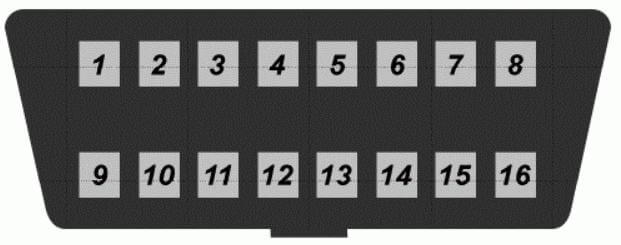
1) With the IGN key off. Use a digital meter, check the resistance on pins 6 and 14 in the OBD II Diagnostic Link Connector (DLC).
2) The correct reading is around 60-Ω. If the reading is within spec, check the connection at ground G114 located near the flywheel on the radiator side of the engine. Clean and secure the ground connection.
3) If that connection is good, move to the ECM X1 connector and check the violet/yellow wire at pin 18 and the violet/yellow wire at the X1 connector on the transmission control module pin 13.
4) However, if the reading is 120-Ω, disconnect connector X110 located under the battery tray.
5) Then check the resistance between pins 13 and 14. The reading should be around 120-Ω.
6) If that checks out, check the resistance between pins 13 and 14 on the female terminal side of the connector. It should be around 120-Ω. If that checks out, look for corrosion in the connector.

The most common causes of Chevrolet Cruze U0100 code and U0101 code
Check for pinched or damaged CAN bus wiring along the front lower left of the subframe, around the transmission module, or corrosion/wiring issues in the fuse box, as detailed in the service bulletin
The most common causes as detailed in service bulletin #17-NA-211
• Check the underhood fuse block for damaged terminals or poor terminal fit and mis-positioned fuses in the fuse block.
• Inspect the TEHCM grounds G106 and G107. Refer to a shop manual for the location of those grounds.
• Powers and grounds should always be load-checked to make sure the circuits are able to work properly.
• Check the harness for rubbing through on any sharp objects mainly on top of the transmission where the harness can contact the sharp area on the block.
• Inspection of the transmission connector pins for damaged terminals or poor terminal fit. After the inspection is complete, reconnect using dielectric grease.
©, 2020 Rick Muscoplat
Posted on by Rick Muscoplat