
How to Fix a Leak in Your Car’s AC and Restore Cold Air
How to Fix a Leak in Your Car’s AC and Restore Cooling
Quick Answer (Featured Snippet)
If your car’s air conditioner isn’t blowing cold air, the most likely cause is a refrigerant leak. The best way to fix a leak in your car’s AC is to locate the source using:
• Pressure testing
• UV dye
• An electronic leak detector
• Replace the leaking component
• Evacuate the system with a vacuum pump; and
• Recharge it with the manufacturer-specified amount of refrigerant and oil. Simply adding more refrigerant without repairing the leak is only a temporary fix.
Finding and Fixing the Leak is the Only Way to Restore Full Cooling
I’ve diagnosed hundreds of automotive air conditioning problems over the years, and if there’s one lesson I’ve learned, it’s this: refrigerant doesn’t simply disappear.
When someone tells me, “My AC worked great last summer, but now it barely cools,” I don’t reach for a recharge can. I start looking for a leak.
That’s because automotive air conditioning systems are sealed. Whether your vehicle uses R-134a or the newer R-1234yf refrigerant, the refrigerant should remain inside the system for years. If cooling performance drops, refrigerant has escaped somewhere, and until I find that leak, any recharge is only buying time. Worse yet, adding refrigerant into a leaking system can cause far more costly damage.
Unfortunately, I’ve seen too many compressors destroyed because owners skipped the diagnosis and simply kept adding refrigerant every summer.
Signs of Refrigerant Leak
One of the easiest ways to avoid a major repair bill is recognizing the early warning signs before the compressor begins running with insufficient lubrication.
The most common signs of refrigerant leak include:
• Air isn’t as cold as it used to be
• Cooling gradually declines over weeks or months
• Compressor clutch cycles rapidly
• Compressor won’t engage
• Oily residue around AC hoses or fittings
• Hissing sound after shutting off the engine
• Frost forming on one refrigerant line
• AC works while driving but warms up at idle
If you notice any of these symptoms, resist the temptation to simply recharge the system. Refrigerant always leaks out for a reason.
Why Refrigerant Leaks Are More Serious Than Most Drivers Realize
One thing I always explain is that, when you have a leak, refrigerant isn’t the only thing escaping. Compressor oil circulates with the refrigerant, so when refrigerant leaks out, so does the lubricating oil. Worse yet, a leak allows air and moisture into the system.
Air and moisture combine with refrigerant oil to form acids that attack aluminum components from the inside. That’s why an inexpensive hose leak can eventually turn into a compressor replacement costing well over a thousand dollars.
Fixing the leak early protects all the expensive components in the AC system.
Car AC Refrigerant Leak Detection: My Step-by-Step Process
Professional car AC refrigerant leak detection follows the same logical process every time.
Step 1: Verify Refrigerant Pressure — Before replacing any parts, I connect manifold gauges to determine whether refrigerant is actually low.
• If the gauges show little or no pressure, I know the refrigerant escaped.
The next step is finding where.
Step 2: Perform a Thorough Visual Inspection — Before using specialized equipment, I inspect every accessible component.
I’m looking for:
• Oily stains
• Dirt stuck to oily fittings
• Damaged rubber hoses
• Corroded aluminum lines
• Bent condenser fins
• Loose service caps
• Compressor oil around the clutch
Because refrigerant carries compressor oil, oily residue often points directly to the leak.
Step 3: Pull a Vacuum — If the system is empty, I connect a vacuum pump.
This serves two purposes:
• Removes moisture trapped inside the system.
• Confirms whether the system can hold a vacuum.
• If the vacuum drops quickly, I know there’s a large leak.
• If it slowly rises toward atmospheric pressure, I’m dealing with a smaller leak.
A stable vacuum is an encouraging sign, though I may still perform additional testing, as some leaks only appear under operating pressure.
Step 4: Add UV Dye — UV dye has become one of my favorite diagnostic tools because it removes the guesswork.
I install a small amount of refrigerant and fluorescent dye, operate the AC long enough to circulate it, then inspect the system using a UV lamp.
Bright yellow-green dye usually appears around the leak.
Typical locations include:
• Compressor shaft seal
• Hose crimps
• Condenser seams
• O-ring fittings
• Schrader valves
• Expansion valve
• Evaporator drain
UV dye gives visual confirmation of exactly where refrigerant is escaping.
Step 5: Use an Electronic Leak Detector — Sometimes dye isn’t enough. That’s especially true when I suspect an evaporator leak hidden inside the dashboard. In those situations, I use an electronic refrigerant detector, commonly called a “sniffer.”
Moving the probe slowly around fittings, hoses, the compressor, condenser, and dashboard vents allows the detector to sense refrigerant molecules escaping into the air.
This tool is extremely effective at finding invisible leaks.
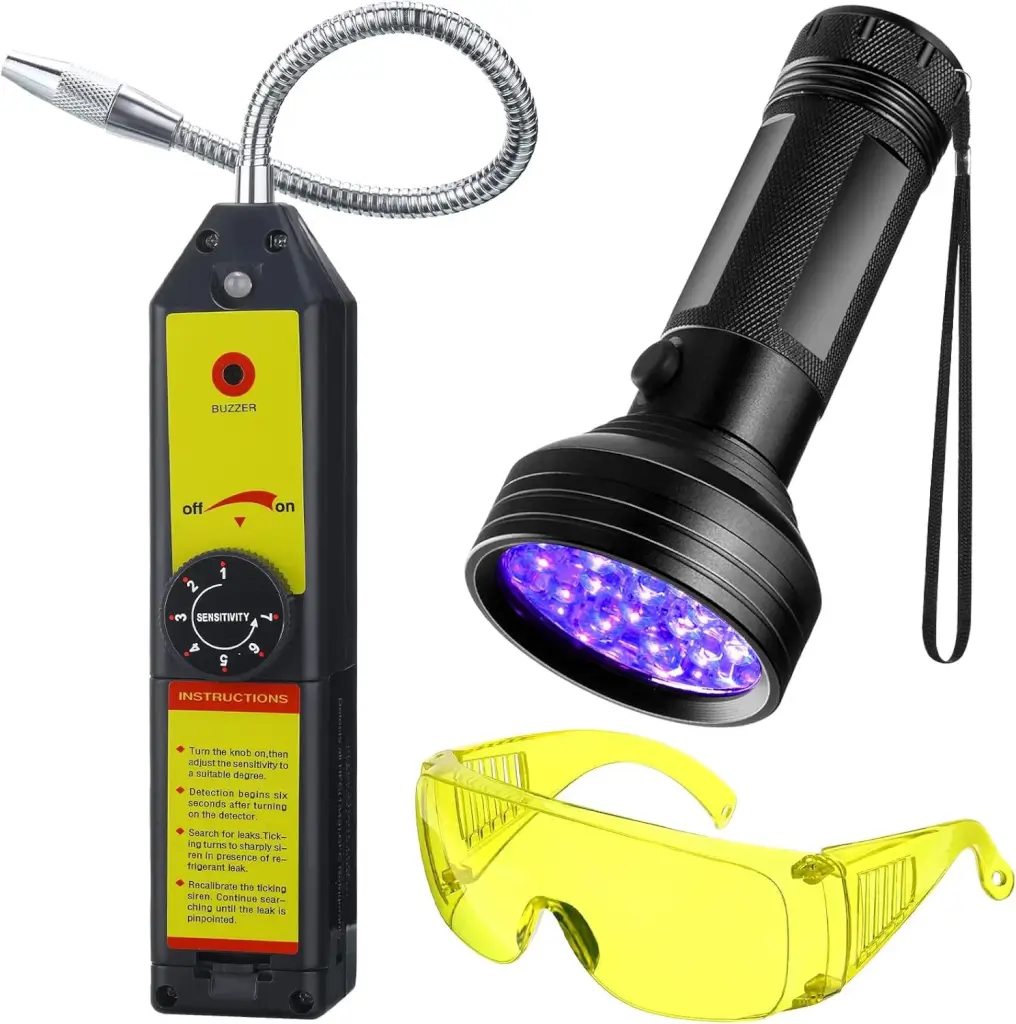
AC leak detector kit
Common places I see refrigerant leaks and UV dye:
• Compressor shaft seal
• Hose crimps
• Condenser seams
• Fittings and connections
• Evaporator drain tube
The dye doesn’t lie—it gives you visual confirmation.
Evaporator Leak Symptoms
An evaporator leak is one of the most difficult AC problems to diagnose because the evaporator core is buried inside the HVAC housing.
Common evaporator leak symptoms include:
• AC loses cooling over several months.
• Refrigerant needs frequent recharging.
• No visible leaks under the hood.
• UV dye appears at the condensate drain tube.
• Electronic leak detector alarms near dashboard vents.
• Compressor cycles frequently because of low refrigerant.
Unfortunately, replacing an evaporator usually requires removing much of the dashboard, making accurate diagnosis especially important.
Where I Find AC Leaks Most Often
After years of diagnosing air conditioning problems, I’ve learned that the same components fail repeatedly.
The most common leak locations include:
• Condenser damaged by road debris
• Compressor front shaft seal
• Rubber hose crimps
• Receiver-drier fittings
• Service port Schrader valves
• O-ring seals
• Aluminum line corrosion
• Expansion valve connections
• Evaporator core
Knowing these common failure points saves considerable diagnostic time.
Can You Fix the Leak Yourself?
Sometimes.
Replacing leaking O-rings, the compressor and condenser, Schrader valves, and accessible rubber hoses is within the ability of many experienced DIY mechanics.
However, replacing the dash evaporator or buried expansion valves can be very difficult for a DIYer. Without the proper equipment, it’s nearly impossible to perform a repair that will last.
How to Repair the Leak Once You’ve Found It
Finding the leak is only half the job. To truly fix a leak in your car’s AC, you have to replace the failed component—not just mask the problem with another can of refrigerant. Over the years, I’ve found that taking the time to do the repair correctly almost always saves money compared to repeatedly topping off the system.
Replace Leaking Your car’s AC O-Rings
O-rings seal nearly every refrigerant line connection, and they’re often the source of slow leaks. When replacing them:
• Always use O-rings designed for automotive AC systems. They are usually made from green HNBR rubber rather than black neoprene.
• Lubricate each new O-ring with the correct refrigerant oil before installation.
• Never reuse an old O-ring, even if it looks good.
• Tighten fittings to the manufacturer’s torque specification to avoid crushing the seal.
Replace Damaged Hoses
Rubber hoses eventually deteriorate from heat, vibration, and age. If a hose is cracked or leaking at a crimp fitting, replace the entire hose assembly rather than trying to repair it.
Replace a Damaged Condenser
The condenser sits at the front of the vehicle and is constantly exposed to rocks, road debris, and corrosion. Even a tiny puncture can cause a refrigerant leak.
Signs of a leaking condenser include:
• Oily spots on the fins
• Visible impact damage
• UV dye around the core
• Refrigerant detected near the condenser with an electronic leak detector
Condenser replacement is often straightforward but always requires evacuating and recharging the AC system afterward.
Compressor Seal Leaks
The front shaft seal is another common failure point. If oil is visible behind the compressor clutch or pulley, the seal may be leaking.
Because compressors wear internally, I generally recommend replacing the entire compressor rather than just the shaft seal.
Why the Receiver-Drier or Accumulator Should Usually Be Replaced
This is one of the most overlooked steps in AC repair. Whenever the system has been empty long enough for outside air to enter, I evaluate the receiver-drier or accumulator for replacement. Its desiccant absorbs moisture. Once saturated, it can’t be restored by pulling a vacuum.
Replacing it helps prevent:
• Internal corrosion
• Acid formation
• Expansion valve restrictions
• Premature compressor failure
Considering the relatively low cost of a receiver-drier or accumulator, replacing it during a major AC repair is inexpensive insurance.
Evacuating the System Before Recharging
One of the biggest mistakes DIYers make is skipping the evacuation process.
After replacing the leaking component, I always connect a vacuum pump and evacuate the system for at least 30 to 45 minutes, depending on the manufacturer’s recommendations.
This process:
• Removes air from the system
• Boils off moisture
• Confirms the repair is leak-free
• Ensures the refrigerant performs efficiently
If the vacuum doesn’t hold, I know another leak still exists.
Recharge the System Correctly
Another mistake I see frequently is charging “until it feels cold.” That’s not how automotive AC systems are designed.
Every vehicle has a specific refrigerant capacity listed on an under-hood label or in the service manual. Charging by pressure alone can result in an overcharged or undercharged system.
For the best results:
• Recharge by weight, not by guesswork.
• Add the correct amount of compressor oil if components were replaced.
• Verify high-side and low-side pressures.
• Measure vent temperature.
• The compressor cycles normally.
A properly charged system will cool better, place less strain on the compressor, and last longer.
Don’t Use Stop-Leak Products
I’m often asked whether AC stop-leak products are worth trying. My answer is almost always no. While these products may temporarily slow a very small leak, they can also:
• Contaminate refrigerant recovery equipment
• Plug expansion valves
• Restrict orifice tubes
• expensive repair problems later
If you’re serious about fixing the system, replace the leaking component instead.
Common Mistakes That Cost Drivers Money
I’ve seen the same mistakes repeated countless times:
• Adding refrigerant without finding the leak
• Ignoring oily residue around fittings
• Skipping vacuum evacuation
• Reusing old O-rings
• Charging the system by pressure instead of weight
• Forgetting to replace the receiver-drier after a major leak
• Using stop-leak products
• Continuing to operate an AC system that’s obviously low on refrigerant
Avoid these mistakes, and you’ll dramatically increase the chances of a successful repair.
Frequently Asked Questions
Can I drive with an AC refrigerant leak?
Yes, but I don’t recommend delaying repairs. Low refrigerant also means reduced compressor lubrication, increasing the risk of compressor damage.
How long does it take to find an AC leak?
Simple leaks can often be found in less than an hour. Small or intermittent leaks may require UV dye and several days of normal driving before they become visible.
Is UV dye or an electronic leak detector better?
Both have advantages. UV dye provides visual confirmation of the leak location, while an electronic leak detector excels at finding hidden leaks, especially inside the evaporator housing.
How much does it cost to fix a leak in your car’s AC?
Repair costs vary widely depending on the leaking component. Replacing an O-ring may cost less than $100 in parts, while an evaporator or compressor replacement can exceed $1,000 on some vehicles.
Final Thoughts
Whenever someone asks me why their air conditioner stopped blowing cold air, I remind them that refrigerant doesn’t simply disappear. If the system is low, there’s a leak somewhere. The secret to a lasting repair isn’t buying another recharge kit—it’s taking the time to diagnose the problem correctly.
When I fix a leak in your car’s AC, I don’t rely on guesswork. I verify the refrigerant pressure, inspect the system carefully, use UV dye or an electronic leak detector as needed, replace the failed component, evacuate the system to remove moisture, and recharge it to the exact factory specifications. Following those steps restores cooling, protects the compressor, and prevents the same problem from returning.
©, 2026 Rick Muscoplat
Posted on by Rick Muscoplat