
How to Fix a Misfire: Step-by-Step Diagnosis Guide
What Causes an Engine Misfire?
Quick Summary
Most engine misfires are caused by worn spark plugs, failing ignition coils, vacuum leaks, fuel injector problems, or low compression. Diagnosing the problem in the correct order saves both time and money while preventing costly damage to the catalytic converter. The most common causes of engine misfires include:
Few engine problems make drivers nervous faster than a rough-running engine. When a vehicle shakes at idle, hesitates under acceleration, or flashes the check engine light, it’s almost always trying to tell you something important.
After diagnosing thousands of drivability complaints over my career, I’ve learned one thing: the fastest way to fix a misfire isn’t replacing parts—it’s following a logical diagnostic process.
An engine misfire occurs when one or more cylinders fail to burn the air-fuel mixture properly. Every time that happens, raw fuel enters the exhaust system where it can overheat and permanently damage the catalytic converter.
That’s why I never recommend driving a vehicle with an active misfire, especially if the check engine light is flashing.
Step 1: Read the Trouble Codes First
Before opening the hood, connect an OBD-II scan tool. The most common misfire codes include:
P0300 — Random or multiple cylinder misfire
P0301-P0308 — Misfire on a specific cylinder
Manufacturer-specific ignition or fuel injector codes
A cylinder-specific code immediately narrows your diagnosis.
A random misfire usually points toward:
• Vacuum leaks
• Fuel pressure problems
• MAF sensor issues
• Mechanical engine problems
Step 2: Inspect the Spark Plugs
The number one reason I see engine misfires is simply worn spark plugs.
Spark plugs operate under extreme heat and pressure. As they wear, the electrodes become rounded, and the spark plug gap grows larger. The ignition coil must produce much higher voltage to jump the larger gap.
Eventually, the spark becomes weak enough for combustion to fail.
Check for:
• Excessive electrode wear
• Incorrect gap
• Carbon fouling
• Oil fouling
• Cracked porcelain
• Damaged threads
Never regap badly worn plugs to save money. Once the electrodes wear, replacement is the only proper repair.
Check for Oil in the Spark Plug Tubes
Many overhead-cam engines develop leaking valve-cover tube seals. When oil fills the spark plug tube:
• Coil boots become oil soaked
• The spark shorts to ground 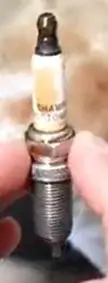
• Misfires become intermittent
• Ignition coils eventually fail
If oil is present:
• Replace the valve cover gasket.
• Replace spark plug tube seals.
• Install new spark plugs.
• Clean or replace contaminated coil boots.
• Apply dielectric grease during assembly.
To check for oil in the spark plug tube
1) Remove the engine cover
2) Remove the ignition coil
3) Shine a flashlight down the spark plug tube. If you see oil pooled at the bottom, the tube seals are bad
How to fix leaking spark plug tube seals.
1) Spray brake cleaner into the spark plug tube.
2) Place a rag over the tube and inject compressed air. Repeat until you’ve flushed out all the oil
3) Replace the valve cover gasket and spark plug tube seals
4) Replace the spark plugs
5) Clean the ignition coil boots with brake cleaner to remove all oil.
6) Apply a small dab of dielectric grease inside each ignition coil boot
7) Install ignition coil
Check spark plug gap
Use a wire-style gap gauge to check the gap. If the gap exceeds the carmaker’s specs, install new plugs. Never close the gap on used plugs with excessive gaps to save money.
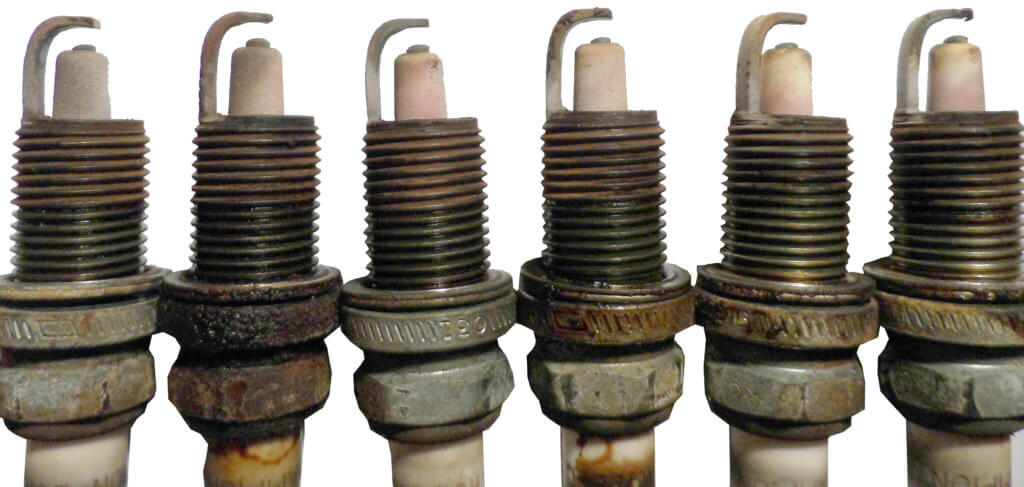
These spark plugs have excessive gaps.
Check the center and side electrode condition
The spark always jumps from a sharp edge on the center electrode to a sharp edge on the side electrode. If the center electrode has rounded edges, it automatically requires a much higher firing voltage. Replace it.
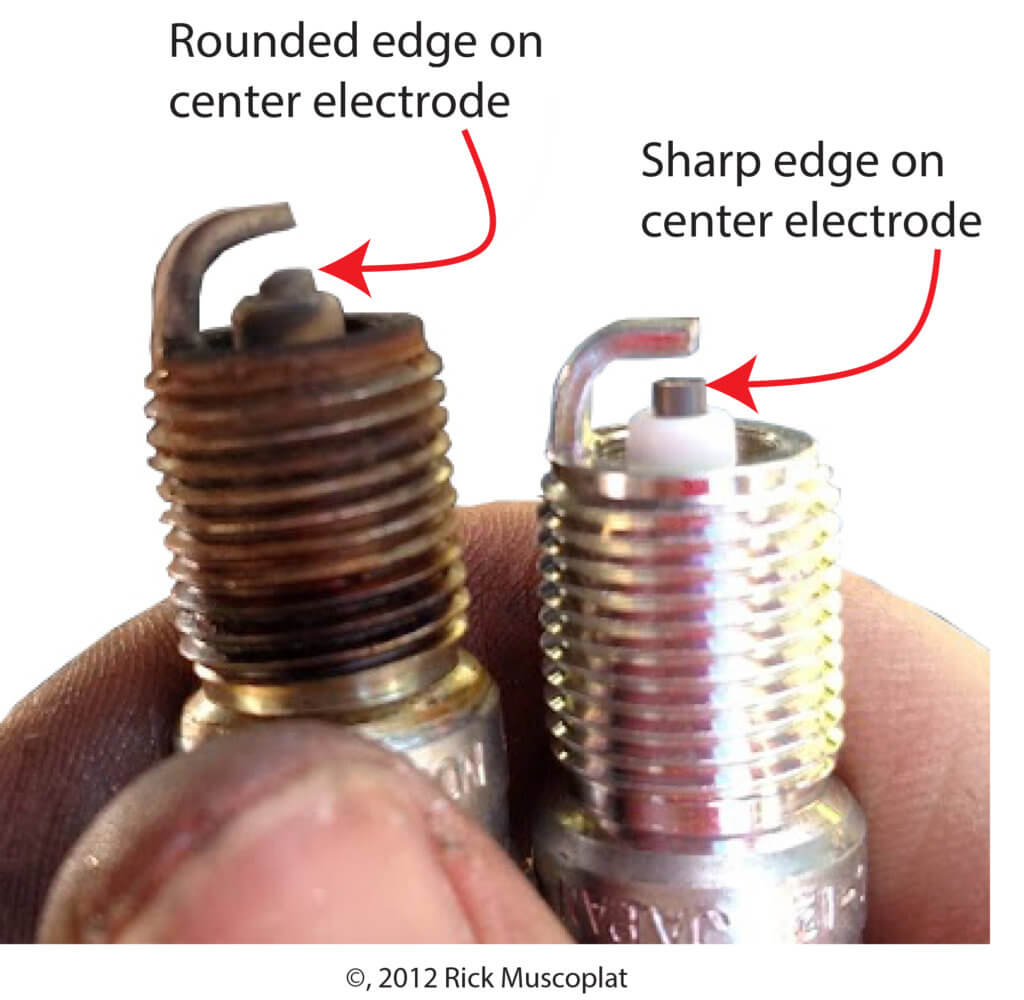
Check the spark plug color
Compare your spark plugs to the conditions shown on this chart from Autolite Spark Plugs.
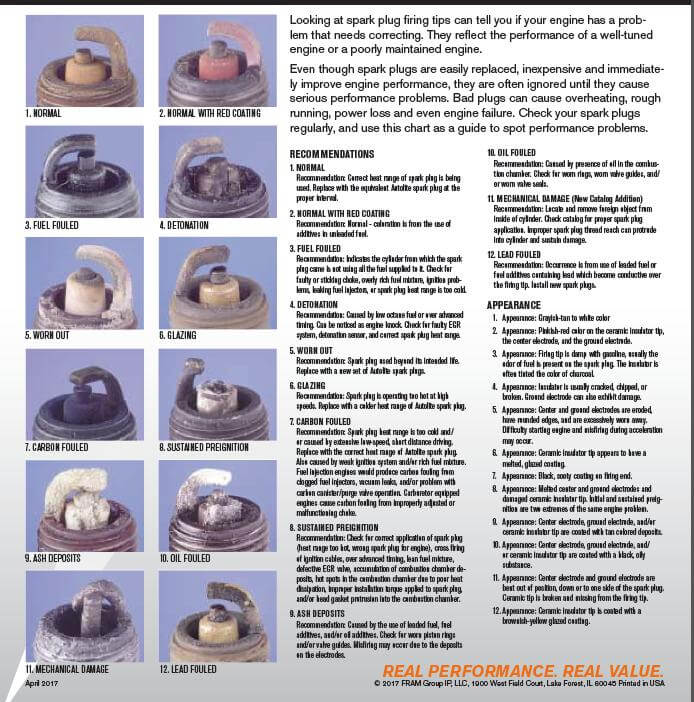
Click on the image to open a PDF of the Autolite Spark Plug Color Chart
Step 3: Test the Ignition Coils
Many people assume ignition coils fail randomly. They usually don’t.
An easy way to diagnose a coil-on-plug ignition system is to swap the suspect coil with another cylinder.
If the misfire follows the coil, you’ve found the problem.
Diagnose misfires caused by the ignition coil
#1 Cause of ignition coil failure — worn spark plugs and/or spark plug wires
Excessive firing voltage caused by worn spark plugs (the excessive spark plug gap), excessive resistance, or an open in the spark plug wires. The higher-than-normal firing voltages raise coil temperatures and degrade coil windings.
#2 Cause of ignition coil failure — air/fuel-related problems creating a lean mixture
Lean air/fuel ratios can be caused by clogged fuel injectors or vacuum leaks, which require much higher firing voltages to establish the spark. The higher-than-normal firing voltages raise coil temperatures and degrade coil windings.
#3 Cause of ignition coil failure — winter temperatures and worn spark plugs
It takes a much higher firing voltage to ignite cold fuel and cold air. If the spark plugs are worn, it requires an even higher voltage, which damages the ignition coil.
How an ignition coil is damaged
In cases where the ignition coil must constantly generate a higher-than-normal firing voltage due to worn plugs, spark plug wires, or a lean air/fuel condition, the higher voltage causes excess heat, which degrades the coil winding insulation, causing coil failure over time.
Step 4: Verify the Air/Fuel Mixture
If the ignition system checks out, I move to fuel trims.
Using live scan data:
• Long-Term Fuel Trim above +10% usually indicates a lean condition.
• Long-Term Fuel Trim below −10% usually indicates a rich condition.
Lean conditions commonly result from:
• Vacuum leaks
• Intake manifold leaks
• PCV leaks
• Low fuel pressure
• Dirty fuel injectors
Rich conditions may be caused by:
• Leaking injectors
• Faulty MAF sensor
• Restricted air filter
• Carbon buildup in the throttle body
Fuel trim data often points directly toward the underlying problem before you remove a single component.
Using a scan tool with live data, check the long-term fuel trims for values above or below ±10 %. That’s an indication of an air/fuel mixture problem.
If the computer is adding fuel in excess of 10%, check for a vacuum leak or an exhaust system leak.
If the computer is subtracting fuel by more than -10%, check for a leaking fuel injector, a faulty mass airflow sensor, or a carboned throttle body.
Step 5: Check the Fuel Injectors
A clogged or failing injector can easily create a single-cylinder misfire.
Signs include:
• Rough idle
• Engine stumble
• Cylinder-specific misfire code
• Poor fuel economy
• Hard starting
Professional shops often perform injector balance tests to verify proper fuel delivery.
Fuel injector cleaners sometimes help with minor deposits, but severely restricted injectors usually require professional cleaning or replacement.
Step 6: Look for Vacuum Leaks
Vacuum leaks remain one of the most overlooked causes of engine misfires. Extra air entering the engine creates a lean mixture that is much harder to ignite.
Common leak locations include:
• Intake manifold gasket
• PCV hoses
• Vacuum hoses
• Brake booster hose
• EVAP system hoses
Smoke testing remains the fastest and most accurate method of locating small intake leaks.
Step 7: Verify Engine Mechanical Condition
If ignition and fuel systems check out, it’s time to verify the engine itself.
I perform:
• Compression test
• Wet compression test
• Cylinder leak-down test
Low compression may indicate:
• Burned exhaust valve
• Broken valve spring
• Worn piston rings
• Damaged piston
• Blown head gasket
• Timing chain or belt problems
Mechanical failures generally produce persistent misfires that no amount of tune-up work will correct.
Can You Drive With an Engine Misfire?
I don’t recommend it. Even a minor misfire can quickly destroy a catalytic converter by allowing raw fuel to burn inside it.
• Replacing spark plugs might cost a few hundred dollars.
• Replacing catalytic converters can easily cost several thousand dollars.
If your check engine light is flashing, stop driving as soon as it’s safe to do so.
Tips to Prevent Future Engine Misfires
I recommend these maintenance practices:
• Replace spark plugs at the manufacturer’s recommended interval.
• Repair oil leaks before they contaminate ignition coils.
• Replace dirty air filters regularly.
• Use quality fuel from reputable stations.
• Clean the throttle body when carbon buildup develops.
• Address check engine lights immediately.
• Repair vacuum leaks before they become larger problems.
Following these simple steps dramatically reduces the chances you’ll have to diagnose another misfire.
Final Thoughts
When drivers ask me how to fix a misfire, I always give the same advice: diagnose first and replace parts second.
Most engine misfires are caused by fairly common problems like worn spark plugs, failing ignition coils, vacuum leaks, or clogged fuel injectors. A scan tool, fuel trim data, and a systematic diagnostic process will usually identify the problem quickly.
Taking the time to diagnose the root cause not only restores smooth engine performance but can also save you from an expensive catalytic converter replacement later.
© 2012 Rick Muscoplat
Posted on by Rick Muscoplat