
How to Rebuild an Alternator Yourself and Save Big Money
How to Rebuild an Alternator: Tools, Steps, and When It’s Worth It
Quick Summary
Rebuilding your alternator is the perfect DIY project. All you need is the right tools, a clean workspace, and quality replacement parts. Most alternator failures are due to a faulty voltage regulator, blown diodes, and worn-out brushes and bearings — all readily available as alternator parts. The key is knowing when a rebuild makes sense, where to buy quality kits, and how to reassemble everything correctly so it lasts.
Understanding Your Car’s Alternator: What It Is and How It Works
Article
How to Rebuild an Alternator Yourself: A First-Hand, Step-by-Step Story
After decades under the hood, I’ve learned that alternators aren’t nearly as difficult to rebuild as people think. When one fails, the knee-jerk reaction is to grab a remanufactured unit off the parts store shelf. Sometimes that’s the right move—but often it’s not. If the housing, rotor, and stator are sound, a well-selected alternator rebuild kit can bring your original unit back to life and outperform many mass-rebuilt units.
Inside are only a handful of components that actually wear out. Brushes slowly grind down as they ride on the slip rings. Bearings can become noisy due to heat and mileage. Rectifier diodes and the voltage regulator take a beating from electrical load and heat cycling. Those are precisely the alternator parts included in a good rebuild kit, which is why a DIY rebuild is so effective.
What Usually Fails Inside an Alternator
In my experience, brushes and bearings are the most common culprits. When brushes get short, charging becomes intermittent. When bearings fail, you’ll hear the classic whine or growl that changes with engine speed. Diodes and regulators fail more subtly, causing undercharging, overcharging, or mysterious battery drains. Replacing these items with a high-quality alternator rebuild kit addresses nearly all common failure modes.
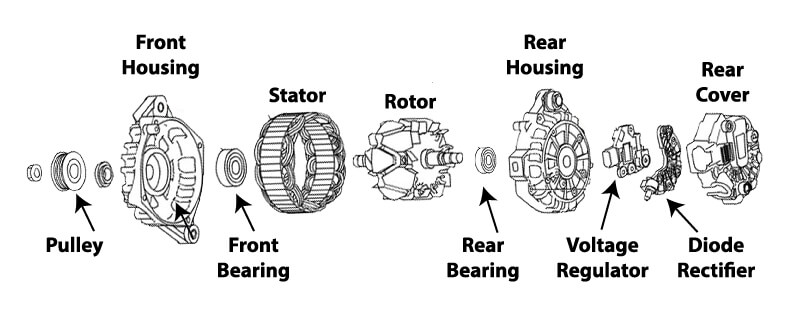
Exploded view of car alternator showing voltage regulator, diode rectifier, front and rear alternator bearings, alternator rotor and stator, and housings
Brushes and slip rings – The brushes wear down like brake pads and eventually lose contact.

Brushes and slip rings
Bearings – These components wear out, causing whining or grinding noises.

Voltage regulator – Can fail electrically and cause overcharging or undercharging. Older vehicles designed the voltage regulator to sit inside the alternator or externally. However, late model vehicles with power management systems control the alternator output from the ECM.

Rectifier diodes – Burn out from heat and electrical stress, leading to weak charging or battery drain.

An alternator rebuild kit typically contains new brushes, bearings, rectifier diodes, and, in some cases, a voltage regulator. By replacing these components, you keep your factory alternator housing and restore its service life.

Typical alternator rebuild kit
Tools and Setup: Where Most DIY Rebuilds Go Right—or Wrong
You don’t need a full machine shop to rebuild an alternator, but you do need the right tools and a clean bench. Basic hand tools are sufficient for disassembly, but a pulley puller is sometimes required to remove the drive pulley without damage. A bearing puller or press prevents damage to new bearings during installation. Many alternator parts, especially rectifier diodes, require soldering, so a temperature-controlled soldering iron rated at 300 W or higher is non-negotiable.
A multimeter is critical before and after the rebuild. I always test continuity, diode function, and final output voltage. This step alone separates a professional-grade rebuild from a gamble.
Disassembly: Taking the Alternator Apart Without Creating Problems
With the battery disconnected, remove the drive belt and disconnect the electrical connectors from the alternator. Then remove the alternator from the vehicle. \
Next, remove the pulley. If your alternator is equipped with an overrunning decoupled pulley, you’ll need special tools to remove the old unit and install the new one. See this article for more information on decoupled pulleys.
Then remove the bolts securing the two-piece housing. Most housings are held together with long through-bolts. Remove them evenly, then carefully split the case. Don’t pry aggressively; aluminum cracks easily.
As the case separates, the rotor, stator, and bearings come into view. This is where I slow down. I inspect windings for burnt insulation and check the slip rings for deep grooves. If the rotor or stator is badly damaged, no alternator rebuild kit will save it—and that’s when replacement makes more sense.

Inspect the components— Look for burned windings, cracked housings, or severe rotor/stator damage. If the core is badly damaged, an alternator rebuild kit may not be enough—you may need a replacement.
Replace the wear parts— Use the rebuild kit to install new brushes, slip rings, diodes, bearings, and regulator as needed. This is where soldering may come into play.
Reassemble and torque to spec— Reinstall the rotor, stator, and bearings, then torque the pulley and housing bolts properly.
Bench test the alternator— With a multimeter or alternator tester, verify that the unit produces the correct voltage and that the diodes and regulator are working correctly.
Reinstall in the vehicle— Mount the alternator back on the engine, reattach the belt and wiring, and reconnect the battery.
Replacing Alternator Parts: The Heart of the Rebuild
This is where the rebuild earns its value. New bearings are pressed in square and fully seated. Brushes are replaced or soldered in, depending on design. Rectifier diodes are swapped carefully to avoid overheating them during installation. If the voltage regulator is internal, I replace it every time—it’s cheap insurance.
Using a high-quality alternator rebuild kit is essential here. Cheap kits often include low-grade bearings or incorrect regulators, which is why I avoid marketplace sellers. Good alternator parts fit correctly, solder cleanly, and last.
Reassembly and Testing: Where Success Is Locked In
Reassembly is simply the reverse of disassembly—but precision matters. The rotor must spin freely. Bearings must seat without preload. Housing bolts and pulleys must be torqued correctly. I always spin the unit by hand before testing.
Before reinstalling the alternator, I bench test it. If the voltage output is stable and the diode tests pass, I know the rebuild alternator job is done right. Once installed, I verify the charging voltage under load. That final check confirms the rebuild was worth the effort.
Sources for Alternator Rebuild Kits
Lots of companies sell alternator rebuild kits, but many of the cheaper kits contain low-quality bearings and incompatible voltage regulators. Please don’t buy alternator rebuild kits from places like Amazon. Instead, buy from reputable sellers like the ones listed below.
maniacelectricmotors.com
aspwholesale.com
dahkee.com
Is Rebuilding an Alternator Worth It?
When the core is good and you have the tools, I’m a strong believer in rebuilding. A rebuild-alternator job typically costs $20–$50 in parts, versus hundreds for a replacement. You keep your original OEM housing and control exactly which alternator parts are replaced. The trade-off is time, effort, and the lack of a store warranty.
For a daily driver where downtime isn’t an option, a new alternator can make sense. But when I want durability and value, I’ll rebuild an alternator myself every time.
Pros of an Alternator Rebuild
• Cost savings – An alternator rebuild kit often costs $20–$50, compared to $150–$300 for a remanufactured unit or even more for new.
• Retain factory housing – OEM alternators are usually higher quality than some aftermarket rebuilds. Rebuilding lets you keep the original casing and design.
• Satisfaction and skill building – There’s a real sense of accomplishment in rebuilding something instead of replacing it.
Cons of an Alternator Rebuild
• Time-consuming – A full alternator rebuild may take several hours, especially if it’s your first time.
• Special tools required – Bearing presses and soldering irons aren’t in everyone’s toolbox.
• Not always practical – If the rotor or stator is burned beyond repair, no rebuild kit will fix it.
• Warranty concerns – Store-bought reman units usually come with a 1–3 year warranty. With a DIY rebuild, you’re your own warranty.
Buying a Rebuilt or New Alternator vs. Rebuilding Yourself
• Remanufactured unit – Convenient, comes with a warranty, but quality varies. Some rebuilders replace only the bare minimum parts.
• New alternator – Best long-term reliability, but also the most expensive option.
• DIY alternator rebuild – Cheapest option, gives you control over what parts are replaced, but requires skill and time.
I personally recommend an alternator rebuild when you already have the tools and the alternator housing and windings are in good shape. If your vehicle is critical to daily use and downtime isn’t an option, buying a new or quality remanufactured alternator is often the safer bet.
©, 2025 Rick Muscoplat
Posted on by Rick Muscoplat