
The Ultimate Guide to using Fix a Flat: Step-by-Step Instructions
How to Use a Fix-a-Flat Product to Fix a Flat Tire
Flat tires are an inevitable part of driving that can happen to anyone, anywhere, and at any time. While a spare tire and jack are the ideal solution, sometimes circumstances require a quicker, temporary fix. This is where fix-a-flat products come in handy. These products are designed to seal small punctures and reinflate the tire enough to get you to a repair shop. Here’s a comprehensive guide on how to use a fix-a-flat product to fix a flat tire effectively.
When to Use a Fix-a-Flat Product
Before using a fix-a-flat product, assess the situation to determine its appropriateness. Here are some guidelines. It is NOT applicable for all flat tire situations!
• Size of the Puncture— Fix-a-flat products are typically effective for small punctures up to 1/4 inch in diameter. Larger punctures or sidewall damage will require a professional repair.
• Location of the Puncture— These products work best on punctures located in the tread area. They are not suitable for tire shoulder or sidewall punctures.
• Condition of the Tire— If the tire has significant damage, such as large tears or extensive wear, using a fix-a-flat product is not advisable.
• Environmental Conditions— Fix-a-flat products may not work as effectively in extremely cold temperatures. Ensure the product is stored within the recommended temperature range. Warm using the cabin heater to bring it to opearting temperature.
Step-by-Step Guide to Using a Fix-a-Flat Product
You don’t need to remove the puncturing object before using a fix a flat product. Here’s how to use a fix-a-flat product to fix a flat tire temporarily:
1) Find a Safe Location: If you notice a flat tire while driving, pull over to a safe location away from traffic. Turn on your hazard lights and apply the parking brake.
2) Inspect the Tire: Examine the tire to identify the puncture location and ensure it’s suitable for a fix-a-flat product. Remove any visible debris, such as nails or screws, from the puncture site.
3) Move the vehicle so the puncture is at the bottom (6:00 position)
4) Prepare the Can: Shake the fix-a-flat can vigorously for about 30 seconds. This ensures the sealant is properly mixed and ready for use.
5) Remove the Valve Cap: Unscrew the valve cap from the flat tire’s valve stem. Keep the cap in a safe place as you’ll need to replace it later.
6) Attach the Hose: Attach the hose from the fix-a-flat can to the tire’s valve stem. Ensure it’s securely connected to prevent any leakage.
7) Release the Sealant: Press the button on the fix-a-flat can to release the sealant into the tire. Keep the can upright and allow it to empty completely. This may take a few minutes, depending on the product.
6) Inflate the Tire: As the sealant fills the tire, it will also inflate it to a drivable pressure (which may not be the tire’s full pressure). Check the tire pressure with a gauge if possible. The goal is to achieve enough pressure that allows you to drive safely to a repair shop. Add more air if needed.
7) Disconnect and Replace the Valve Cap: Once the can is empty, disconnect the hose from the valve stem and replace the valve cap.
8) Drive Immediately: Drive the vehicle for 2-4 miles to allow the sealant to distribute evenly inside the tire and fully seal the puncture. This step is crucial for ensuring the temporary fix is effective.
9) Have the tire repaired professionally within 3 days or 100 miles. Fix a flat products are a temporary repair. Do not drive on the tire for more than 3 days or 100 miles.
Post-Repair Considerations
After using a fix-a-flat product, it’s important to have the tire professionally inspected and repaired or replaced as soon as possible. Here’s why:
The sealant must be removed from the tire— The tire technician must wash the tire and rim to remove all tire sealant. Leaving it in the tire can cause imbalance issue and make it harder to remove in the future. A shop may charge extra to remove and clean your tire and wheel prior to performing a permanent repair.
Potential Damage: Driving on a flat tire, even temporarily, can cause damage to the tire and rim. A professional inspection will identify any additional issues that need addressing.
Does Fix a Flat work?
Yes, if your puncture is small and you follow the directions
Debunking the most common myths
It’ll damage your tire or wheel—
MYTH: Fix a Flat injects a sealant into the tire. The sealant will not damage either your tire or the wheel. The shop making the repair will have to clean out the tire and the wheel, and the shop may charge more than their normal tire repair charge to clean up the tire and the wheel.
It can’t be removed from your wheel
MYTH: The sealant is water-based and can be removed from the inside of your tire and wheel using soap and water.
It’ll damage or clog your tire valve or tire pressure sensor
MYTH: Fix a Flat will not clog your tire valve or tire pressure sensor. The can of material first injects the sealant, and the remaining propellant will blow out any residual sealant remaining in the tire valve stem
It’s flammable and can injure tire shop technicians
MYTH: The current Fix A Flat sealant formula is NOT flammable
How much Fix a Flat do you need?
Pickup trucks need 1 Extra large can 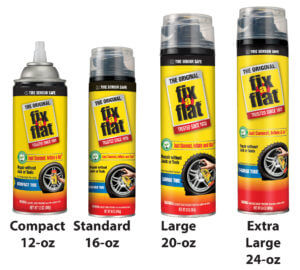
SUVs need 1 Extra large and 1 large can
Crossover SUV needs 1 large can
Wagon needs 1 large and 1 standard can
Mid sized sedan needs 1 standard can
Compact needs 1 standard and 1 compact can
Sub compact needs 1 compact can
©, 2019 Rick Muscoplat
Posted on by Rick Muscoplat