
Bad Starter or Battery? How to Know for Sure
The Right Way to Diagnose Bad Starter Problems
Quick Summary
A starter clicks condition can mean low voltage, high resistance, or an internal solenoid failure. Before replacing anything, verify the battery condition and the integrity of the battery cable/terminal connections. Next, perform a voltage drop at the battery and starter connections. Finally, test the control circuit operation. That’s the correct way to diagnose a bad starter
Article
How to Diagnose a Bad Starter Like a Pro (Before You Replace It)
I’ve seen too many perfectly good starters replaced because someone heard a click and assumed it was a bad starter. The sound of a clicking condition is only a symptom. The real work begins when you decide to diagnose starter complaints rather than guess.
A starter motor requires three things:
1) Proper battery voltage
2) Sufficient current flow
3) A functioning control signal.
If any one of those is compromised, the starter won’t crank—even if it’s perfectly healthy.
What a “Starter Clicks” Condition Really Means
When a customer says the starter clicks, that tells me the solenoid is at least trying to engage. That clicking noise is the solenoid plunger moving forward. But here’s the key detail: the solenoid may not be able to close the high-current contacts.
When you hear loud clicks, you should suspect:
• A weak battery
• High resistance in battery cables
• Corroded terminals
• Internal solenoid contact wear
• Or yes, possibly a bad starter
If you hear rapid clicking, that almost always points to low voltage. That’s a battery or connection issue, not a failed starter.
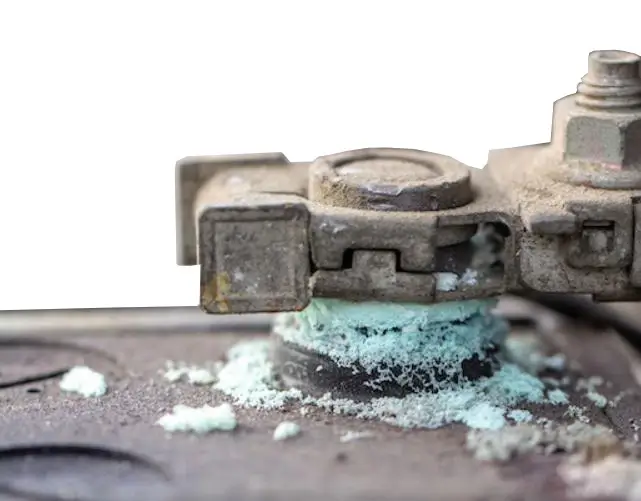
Corroded battery terminals cause high resistance between the battery post and the cable terminal, reducing the available voltage and current to run the starter.
This is why you never jump straight to replacing the unit before properly diagnosing the symptoms.
Step 1: Test the Battery Before Anything Else
Before I even think about calling it bad, I check the battery state of charge and load capability.
A fully charged battery should read around 12.6 volts at rest. But voltage alone doesn’t tell the whole story. I always perform a load test. If the voltage drops below 9.6 volts under load, that battery is suspect. See this post for step-by-step instructions on how to perform a battery load test using a multimeter
You can have a situation where the starter clicks, and everyone blames the starter. In reality, the battery may not have enough amperage to turn the motor.
If you don’t verify the battery first, you’re not really trying to diagnose the starter —you’re guessing.
Step 2: Perform a Voltage Drop Test (This Is Where Most DIYers Go Wrong)
This is the step that separates professionals from parts swappers. Instead of just checking voltage, I perform voltage drop testing on:
• Positive cable (battery to starter)
• Ground cable (battery to engine block)
• Engine block to chassis ground
A good circuit should show less than 0.5 volts drop on either side during cranking.
If the voltage drop is high, replacing the starter won’t fix anything. You haven’t truly tried to diagnose the problems until you’ve tested for voltage drop under load.
See this article on how to perform a voltage drop test using a multimeter
Step 3: Check for Power at the Starter Solenoid
If the battery and cables pass inspection, I move on to the starter itself.
When turning the key to the crank position:
1) The large battery terminal should have full battery voltage.
2) The small trigger wire should receive voltage from the ignition switch or relay.
3) If the trigger wire has no voltage, the problem isn’t a bad starter. It’s likely:
• Neutral safety switch
• Clutch switch
• Ignition switch
• Starter relay
• Anti-theft system
If voltage is present and the starter clicks but does not crank, now I start considering internal failure.
What Actually Fails Inside a Bad Starter
When I tear down a confirmed faulty starter, here’s what I typically find:
• Worn solenoid contacts are extremely common. Over time, the copper

PLunger and copper disc.
On the left: pitted On the right: new
contacts arc and pit. The solenoid moves, you hear the click, but the internal high-current path doesn’t close.
Worn brushes are another frequent issue. When brushes wear down, they can’t maintain contact with the commutator. Sometimes tapping the starter lightly with a tool will temporarily make it work—classic intermittent-starter-clicks symptom.
• Armature windings can short internally. When that happens, you may see high current draw with little or no rotation.
Current Draw Testing: The Definitive Proof
When I really want to confirm a faulty starter, I measure the cranking current.
• Typical gasoline engines draw between 125 and 200 amps. If I see:
• Very high current with no crank → internal short or seized engine
• Very low current with no crank → open circuit or worn brushes
• Normal current but slow crank → mechanical resistance
This removes guesswork entirely. When you combine voltage drop testing with current draw measurement, you can accurately diagnose starter issues every time.
When the Starter Clicks But the Engine Is Locked
I’ve also seen cases where the starter clicks, but the engine itself is seized.
Before condemning the starter, I always verify the engine rotates manually with a breaker bar on the crankshaft pulley. You’d be surprised how often a locked engine gets mistaken for a faulty starter.
Heat Soak and Intermittent Failures
Another scenario I encounter frequently is heat soak. The vehicle starts fine cold, but the starter clicks when hot. In that case, I suspect internal expansion. Heat-soaked internal part expansion can increase resistance at high temperatures. That’s a classic intermittent failure.
If it only fails hot, I test the voltage during the failure event. If the voltage is good and it still won’t crank, I’ve diagnosed a heat-related failure.
Final Thoughts From the Shop Floor
A no-crank problem doesn’t automatically mean a bad starter. A clicking condition is just one clue in a larger diagnostic process.
If you truly want to diagnose starter problems like a professional, you must:
• Verify battery condition
• Perform voltage drop testing
• Confirm control circuit operation
• Measure current draw
• Rule out engine seizure
When you follow this systematic approach, you stop guessing and start diagnosing. That’s how I’ve done it for decades—and it saves time, money, and unnecessary parts replacement.
©, 2026 Rick Muscoplat
Posted on by Rick Muscoplat