
DIY Car Headliner Repair: Step-by-Step Expert Method
Car Headliner Repair: How To Fix Sagging Headliners the Right Way (Better Than Factory)
Quick Summary
A sagging headliner is really a failure with the foam, not the fabric. A proper car headliner repair means removing the cardboard, stripping all degraded foam, and reinstalling new foam-backed fabric using the correct adhesive technique. Shortcuts like glue injection or tacks never last. The real secret to a complete repair is proper surface prep, the correct adhesive application, and wrapping the edges—something most factories don’t even do. Done right, a car headliner repair can outlast the original.
Article
What a Failed Headliner Really Looks Like
When I pull down a headliner, I usually find exactly what you’d expe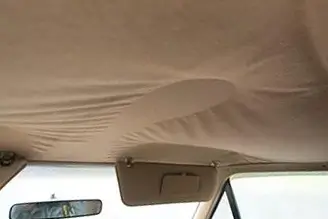 ct—fabric hanging loose, foam turning to powder, and sometimes years of dirt embedded in it. This isn’t something you can patch. At this point, the only real solution is a full car headliner repair, which means removing everything and starting fresh.
Removing the Headliner Without Destroying It
I always start by removing all the interior trim pieces, such as visors, grab handles, dome lights, and clips. There’s no universal method—every vehicle is slightly different—but the process is similar across the board.
TIP: Use zip-lock bags to store the fasteners for each part you remove. Trust me on this one; you don’t want to figure out later which screw goes with which interior piece.
Once everything is loose, the real challenge is getting the board out of the vehicle without bending or cracking it. Trucks and SUVs are usually easier, but sedans can be tight. Sometimes you have to recline seats—or even remove them—to make it work.
The Most Important Step: Removing Old Foam
This is where most DIYers fail. After peeling off the fabric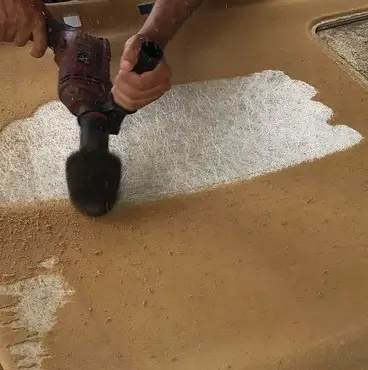 , you’re left with a layer of deteriorated foam stuck to the cardboard. If you don’t remove every bit of it, your car headliner repair will fail. Gluing new foam to old, degraded foam is guaranteed to fail.
I use a drill with a wire brush for bulk removal and a handheld brush for detailed cleanup. In other words, get down to the cardboard so the adhesive can bond to it, not to foam dust.
Choosing the Right Materials for Car Headliner Repair
You cannot use just any fabric or glue.
For a proper car headliner repair, I always use:
• Foam-backed headliner material (this allows stretch and contouring)
• High-quality contact adhesive (heat-resistant)
• Regular spray glue won’t cut it. It will fail—especially in summer heat.
Use the Right Adhesive
This is another area where DIYers can mess up. Many spray adhesives are not rated for heat or foam. So the headliner looks great after you’ve glued it up, but then sags when the car sits out in the sun. Don’t mess up the project by using the wrong adhesive. Here are my recommendations for the right headliner adhesives.
3M Headliner & Fabric Adhesive
Permatex Headliner & Carpet Adhesive
DAP Weldwood Landau Top & Trim Adhesive
Headliner Magic High-Temp Adhesive
Loctite Headliner Adhesive
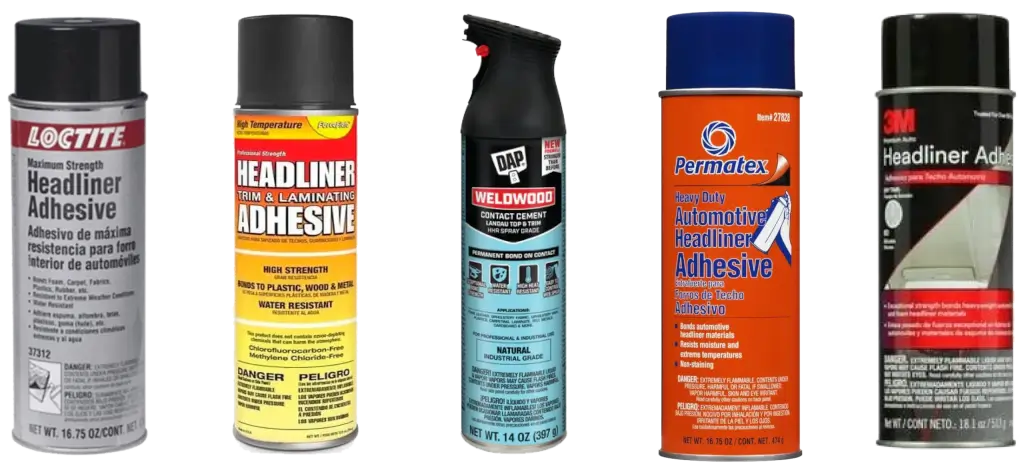
Headliner adhesive brands
Do NOT use 3M Super 77 or general spray adhesives
Do NOT useCraft glue or upholstery glue, not rated for heat
Do NOT use Household adhesives
Applying Adhesive Without Soaking the Fabric
This is where experience really matters. I never spray glue directly into the foam. That soaks through and ruins the material. Instead, spray horizontally so the adhesive “floats” evenly onto the surface.
Apply glue to both the headliner board and the back of the fabric using a 50/50 method.
1) Fold the material in half
2) Glue one side at a time
3) Start in the center and work outward
4) Use a flat hand. No fingertips. Pressing with fingers creates dents that will show forever.
Handling Curves and Contours Like a Pro
When I install the material, I allow extra slack in those recessed areas so the fabric can “hug” the shape. If you stretch it too tightly, it will pull loose later, ruining your car headliner repair.
Take your time here. You only get one shot—contact adhesive doesn’t allow rework.
Wrapping Edges for Better Durability
Wrap the material around the edges of the board. This one step dramatically improves durability and ensures your car headliner repair lasts longer than the original. Make relief cuts in corners so the material lies flat without bunching.
Let It Cure—Don’t Rush This Step
Let the headliner cure for at least 24 hours before reinstalling. This single step can make or break your car headliner repair. Many DIYers reinstall the headliner immediately after gluing it. That’s how you end up with fingerprints, dents, and failed adhesion.
Reinstallation: Getting It Back in the Vehicle
Sometimes you’re dealing with tight spaces, broken components, or even doors that won’t open. Here are some tips:
• Position the rear first
• Use clips to hold it in place
• Work forward, installing components
If you can’t find mounting holes, a scratch awl works great for locating them without damaging the fabric.
Where to buy headliner materials
Midwestfabrics.com
Dltcorporation.com
Yourautotrim.com
Keystonbros.com
Final Thoughts on Car Headliner Repair
After doing countless jobs over the years, I can tell you this: a proper car headliner repair isn’t about speed—it’s about technique.
• Remove all the old foam
• Use the right adhesive
• Apply glue correctly
• Wrap the edges
• Let it cure
You’ll end up with a result that looks professional and lasts for years. Cut corners, and you’ll be doing the job all over again.
©, 2026 Rick Muscoplat