
Torn Car Seat Repair: The Right Way to Fix It for Good
Step-by-Step Guide to Fixing a Torn Car Seat
Quick Summary
The key to properly fixing a car seat is to remove the panel with the tear and replace it, rather than patching it. Patching never works long-term. You can buy new carpet upholstery online to match the original. By removing the damaged section and using it as a pattern, you can cut the replacement material and sew it in place for a perfect repair. Done correctly, the repair blends in and lasts for years instead of months.
Article
How to Fix a Torn Car Seat Like a Pro
I’ve repaired several torn car seats on my vehicles and for friends and family. I’m not a professional auto upholsterer, but I do know the right and wrong ways to repair torn car seats. Most people think they can just glue it, tape it, or throw a cover over it. I’ve seen all of it. But if you want a repair that actually holds up, you need to approach fixing a torn car seat the way an upholsterer would—by properly replacing the damaged material.
Step One: Getting Access Without Making More Problems
One thing you must consider before you even start to fix a torn car seat is how to access the seat cover. In many cases, you don’t have to remove the seat from the vehicle. In fact, if your seats have airbags, you don’t want to remove the seat unless you have no other choice.
Car seat covers aren’t just draped over the foam—they’re engineered to stay tight, wrinkle-free, and secure under years of use. From the factory, they’re anchored to the seat frame and foam cushion with a combination of fastening methods that hold everything in place and maintain that clean, OEM look.
Most modern seats rely heavily on Velcro. The underside of the upholstery has Velcro strips sewn into it, which press onto matching hook strips embedded in the foam. This helps shape the seat and keeps the cover from shifting around, especially in contoured areas.
Hog rings are another common attachment 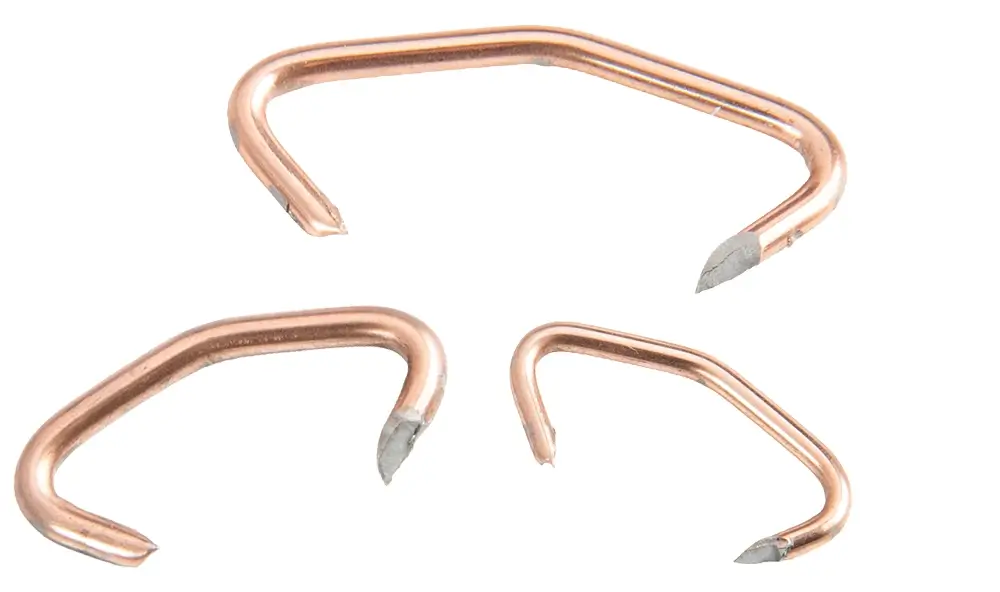 method, especially in traditional upholstery work. These small metal fasteners act like heavy-duty staples, securing the seat cover to metal rods molded into the foam cushion. They’re what give the seat its tight, sculpted appearance and keep the material pulled down into the contours.
Along the edges, you’ll often find plastic J-clips. 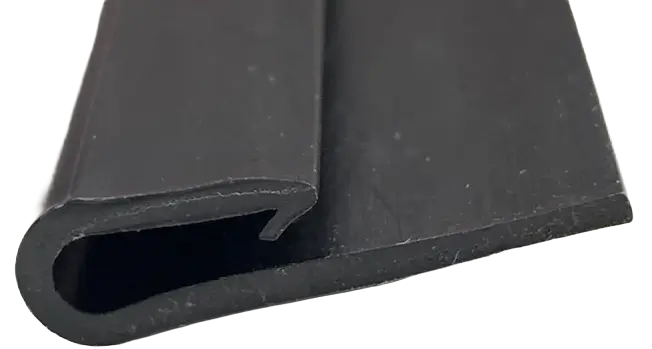 These are molded into the seat cover and hook directly onto the seat frame or pan. They’re quick to install and provide a strong, consistent hold—especially around the perimeter of the seat base and backrest.
On aftermarket seat covers, the approach is usually a bit simpler. Instead of hog rings or molded clips, they often use straps with S-hooks. These pull the cover tight underneath the seat and attach to the frame, providing a snug fit without the need for specialized tools. All of these systems work together to ensure the seat cover stays firmly in place, maintains its shape, and delivers that tight, factory-style finish you expect.
• Use a hook tool to release the clips and seat hooks that attach the seat cover to the frame.
• Use a diagonal cutter to remove hog rings
Step Two: Assess the Damage
Don’t just focus on the visible tear. Instead, look at the surrounding panels. Most of the time, if one section is worn, the adjacent panel isn’t far behind. If there’s other wear or pending damage, now is the time to address it. In other words, you may find it smarter to replace several panels at one time because it’s easier to sew.
Step Three: Using the Old Material as a Pattern
Once the cover is off, use a stitch ripper to disassemble the damaged sections, and mark all seam intersections before cutting. That way, there’s no guesswork when you sew it back together.
Step Four: Sewing It Back Together Properly
Now comes the part that really determines whether you successfully fix a torn car seat—sewing. Match the stitch length as closely as possible to the original. Once the seat is back together, nobody will be comparing stitch counts. What matters more is that the seams are straight, strong, and clean.
I also align reference marks to ensure everything lines up exactly as the factory intended. That’s how you get a repair that doesn’t scream “I’ve been fixed.”
Step Five: Don’t Ignore the Foam
Here’s something most people miss when dealing with a tear in car seat upholstery—the foam underneath is usually damaged too. If you skip this step, your new cover will look good for a short time, but it won’t last.
Repair the foam by filling in worn areas to restore it to its original contour.
Step Six: Reassembly and Final Fit
Once everything is sewn and the foam is repaired, reinstall the cover in reverse order. All the seat hooks are put back in place, the clips are secured, and the panels are reattached. At this point, the seat should look like it was never damaged.
Final Thoughts
A torn car seat might look like a simple problem, but the proper repair requires a combination of upholstery work, patternmaking, and attention to detail.
Do it right, and you’ll have a seat that looks factory again.
Do it halfway, and you’ll be fixing that same tear again in a few months
©, 2026 Rick Muscoplat
Posted on by Rick Muscoplat