
Bad Battery or Alternator? Here’s How to Tell the Difference
How to Diagnose a No-Start Condition Like a Pro
Quick Summary
When diagnosing a no-start condition and trying to determine whether it’s caused by a bad battery or an alternator, always test the battery first. Testing the alternator first can give you false results because an alternator needs power to generate power. Start by cleaning battery terminals, checking battery voltage, and performing a battery health test. Once you’ve confirmed the battery is fully charged and healthy, test the alternator output under electrical load. In most no-start situations, the battery is the culprit, but a failing alternator, a slipping belt, a blown charging fuse, or a parasitic battery drain can produce similar symptoms. Following a systematic testing procedure prevents the replacement of the wrong part and the waste of money.
If it’s not a cranking problem, read Why Your Car Struggles to Start and What to Check First
Understanding a Bad Battery or Alternator No-Start Condition
One of the most common questions I hear from vehicle owners is whether a no-start problem is caused by a bad battery or alternator. The symptoms can look remarkably similar. The engine won’t crank, the lights may be dim, and the battery may appear dead.
Many people immediately assume the alternator has failed. In reality, most no-start complaints are caused by a weak battery, poor cable connections, or a battery that has simply reached the end of its service life.
The key is following a logical testing sequence.
I never test the alternator until I’ve verified the battery is healthy and fully charged. A discharged battery can make a perfectly good alternator appear defective.
Step 1: Inspect and Clean Battery Connections
Before grabbing a meter, I always inspect the battery terminals and cables.
Corrosion creates electrical resistance that

Notice the corrosion and the wetness on the top of the battery. This car battery is leaking between the case and the post
reduces charging efficiency, preventing the starter from receiving enough current. Dirty or loose terminals can also distort voltage readings and lead to incorrect conclusions.
Check for:
• White or green corrosion
• Loose battery terminals
• Damaged cables
• Corroded ground connections
• Loose alternator connections
I recommend disconnecting and cleaning both battery terminals with a wire brush, even if corrosion isn’t obvious. See my post on battery terminal cleaning for more information.
Step 2: Test Battery Voltage First
The next step is checking the battery state of charge. Using a digital multimeter connected directly to the battery posts:
Battery Voltage Readings
12.6 volts = Fully charged battery
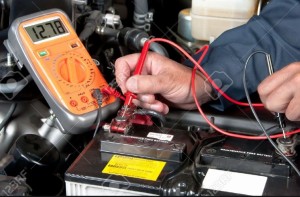
Check battery voltage with a multimeter
12.4 volts = Approximately 75% charged
12.2 volts = Severely discharged
Below 12.0 volts = Extremely discharged
A battery reading 12.2 volts or less should be fully recharged before performing any additional testing. Testing the alternator with a discharged battery often produces misleading results.
Step 3: Test Battery State of Health
This is where many DIYers make mistakes. Battery voltage only indicates charge level. It does not tell you whether the battery is healthy. A battery can show 12.6 volts and still fail to start the vehicle because of:
• Internal plate damage
• High internal resistance
• Sulfation
• Failed cell connections
The best test is a conductance or electronic load test. These tools measure the battery’s ability to deliver current under load and provide a pass/fail result.
If the battery fails a health test, replace it before investigating the alternator further.
What you need to conduct a SOH test

Clore Automotive SOLAR Digital 12V Battery and System Tester
I personally use the Clore Solar BA9 battery tester to check batteries. Find the Clore Solar BA9 on Amazon for $60. The BA9 tests the internal resistance of the plates and bus connections and performs a simulated load test. If the battery fails this test, I know it’s bad.
However, before jumping to conclusions, remember that a bad alternator could be draining the battery and causing it to lose charge. That’s why we’ll continue testing.
Step 4: Inspect the Alternator Belt
Before condemning the alternator itself, inspect the drive belt. A worn, cracked, or slipping serpentine belt may prevent the alternator from spinning fast enough to generate adequate output. A weak belt tensioner can create the same symptoms.
Check for:
• Cracks
• Glazing
• Missing ribs
• Belt contamination
• Weak tensioner operation
Step 5: Test Alternator Output
Once you’ve confirmed the battery is healthy and fully charged, test the charging system voltage. Start the engine and place your voltmeter across the battery terminals.
A healthy charging system should produce:
Normal Charging Voltage
• 13.5 to 14.8 volts in most vehicles
If the voltage remains near battery voltage (around 12.6 volts) while the engine is running, the alternator may not be charging properly.
Test the Alternator Under Electrical Load — Modern vehicles often use smart charging systems that don’t charge aggressively unless electrical demand increases. To properly test alternator performance:
Turn on:
• Headlights
• Blower motor
• Rear defroster
• Heated seats
• Other major accessories
Then increase engine speed to approximately 2,000 RPM.
A healthy alternator should maintain a charging voltage above 13.5 volts. If the voltage falls or remains low, the alternator may be failing.
Don’t Forget Charging Circuit Problems
A good alternator can appear defective if power can’t reach the battery.
Inspect:
• Alternator output wire
• Charging system fuse
• Fusible links
• Ground circuits
A blown charging fuse can completely disable battery charging while leaving the alternator itself fully functional.
Could It Be a Parasitic Battery Drain?
Sometimes both the battery and alternator pass every test, yet the battery repeatedly goes dead. In those situations, I investigate parasitic battery drain.
What is Parasitic Battery Drain?
Parasitic battery drain occurs when one or more electrical components in a vehicle continue drawing current from the battery after the ignition is switched off and the vehicle is parked. Unlike the small, intentional standby draw required by systems such as the clock, PCM keep-alive memory, and alarm module — typically 25 to 50 milliamps — parasitic drain is excessive or abnormal current consumption that depletes the battery over hours or days, leaving the vehicle unable to start.
Common sources include
• A relay stuck in the closed position
• A module that fails to enter sleep mode
• A trunk or glove box light that remains on with the lid closed
• A faulty alternator diode allowing reverse current flow
• An aftermarket accessory wired directly to a constant power source.
The drain may be continuous or intermittent, making diagnosis challenging.
Technicians identify parasitic drain using a digital multimeter set to DC amperage, placed in series between the negative battery terminal and the cable, then systematically pulling fuses one at a time to isolate the offending circuit — a process known as a parasitic draw test or key-off current drain test. Once the circuit is identified, component-level testing determines whether the fault lies in a switch, relay, actuator, or control module.
These problems slowly drain the battery while the vehicle sits, leading to a no-start condition even when the battery and alternator are otherwise healthy. Either way, you must conduct a parasitic battery drain test to locate the problem.
Final Verdict: Bad Battery or Alternator?
When diagnosing a bad battery or alternator, always start with the battery. Verify clean connections, confirm the battery is fully charged, and perform a proper health test before evaluating alternator performance. Once the battery is known to be good, test the charging voltage under load and inspect the charging circuit for wiring or fuse issues. This step-by-step approach eliminates guesswork and ensures you replace the correct component the first time, saving both money and frustration.
©, 2015 Rick Muscoplat
Posted on by Rick Muscoplat