
The Right Way to Charge a Dead Car Battery
How to Charge a Car Battery Step by Step
Quick Summary
Knowing how to charge a car battery correctly can save you from buying a replacement before it’s necessary. I always recommend using a modern smart charger, selecting the correct battery type, and allowing the charger to complete all charging stages. Charging too quickly or relying on your alternator to recharge a dead battery shortens battery life and can even damage your charging system. A slow, intelligent charge is almost always the safest and most effective approach.
Learn How to Charge a Car Battery Without Making These Common DIY Mistakes
When a car battery is dead, the temptation is strong to slap on a charger, crank it up, and hope for the best. I get it—you want to get back on the road. But after decades of diagnosing battery failures, I can tell you this with absolute confidence: rushing the process is one of the fastest ways to destroy a perfectly recoverable battery.
How to Charge a Car Battery the Right Way (Without Damaging It)
Most people think charging a dead battery is simple—hook up a charger, turn it on, and wait. After decades of diagnosing battery failures, I can tell you that’s only part of the story.
If you really want to know how to charge a car battery, you first have to understand why batteries fail, how smart chargers work, and why rushing the charging process often destroys a battery that could have been saved.
Step 1: Inspect the Battery Before Charging
Before connecting a charger, always perform a quick inspection.
Never attempt to charge a battery that has:
• Bulging sides
• Cracked case
• Leaking electrolyte
• Frozen electrolyte
• Burned terminals
If you find any of these conditions, replace the battery rather than attempting to recharge it.
Step 2: Clean the Battery Terminals and Posts
Corroded terminals create electrical resistance that reduces charging efficiency. Use a battery terminal cleaner or a wire brush before connecting the charger.
I always clean:
• Battery posts
• Cable terminals
• Hold-down hardware
Step 3: Verify the Battery’s Condition
A dead battery isn’t always a bad battery. Modern conductance
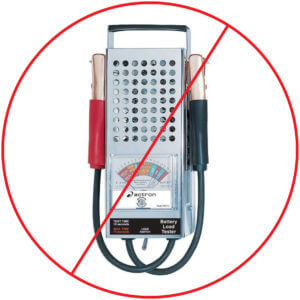
An old-fashioned battery tester
battery testers can quickly determine whether the battery can still accept a charge.
Older carbon-pile (“toaster”) load testers don’t provide nearly as much useful information as today’s electronic testers.
Set up the battery tester
Program the tester to match the battery type in your car. Choose either standard lead-acid (SLA) or absorbed glass mat (AGM). This is important because the tests differ by type. Then enter the battery’s cold-cranking amperage rating (CCA)—found on the battery label. Start the test and read the result.

Modern intelligent battery tester. This one is made by Solar. It’s the BA9 battery tester
Step 4: Choose the Correct Charger
This is where many DIYers make their biggest mistake. I strongly recommend using a microprocessor-controlled smart charger instead of an old manual charger.
Modern chargers automatically regulate:
• Charging voltage
• Charging current
• Charging stages
• Battery maintenance mode
They also work safely with:
• Flooded lead-acid batteries
• AGM batteries
• Gel batteries
• Enhanced Flooded Batteries (EFB)
Why Old-Style Battery Chargers Are Dangerous
Older linear chargers weren’t designed for modern maintenance-free or AGM batteries. Some output up to 20 volts—enough to warp plates, boil electrolyte, and fry vehicle electronics.
If you care about safely charging a car battery, retire the antique charger. Modern batteries demand intelligent charging.
Step 5: Connect the Charger Properly
With the charger unplugged:
• Connect the red clamp to the positive (+) terminal.
• Connect the black clamp to the negative (-) terminal or a suitable chassis ground.
• Verify battery type.
• Select the proper charging mode.
• Plug the charger into the wall outlet.
Most modern chargers perform a self-check before charging begins.
Step 6: Let the Smart Charger Complete All Charging Stages
One of the biggest misconceptions about charging is that the battery is fully charged once the engine starts. It isn’t. A quality charger normally progresses through several charging phases:
The Reconditioning Phase: Undoing Sulfation Damage — When a battery is discharged, sulfate crystals form on the plates. Those crystals are non-conductive, and the longer the battery sits dead, the harder they become. This is why a dead battery often “tests bad” even though it’s physically intact.
The first step when you charge a car battery is reconditioning. The charger starts at a very low voltage and current to gently break down those sulfate crystals and return them to the electrolyte. This phase takes patience—and this is where many people make their first mistake.
The Bulk Charging Phase: Where Most of the Energy Goes In — Once the sulfate crystals are reduced, the charger moves into bulk mode. This is where about 80% of the battery’s capacity is restored. The charger delivers high amperage at relatively low voltage, allowing energy to flow quickly without overheating the plates.
For a deeply discharged battery, bulk charging alone typically takes five to eight hours. That’s a critical piece of understanding how long to charge a car battery, because many people stop right here—long before the job is finished.
The Absorption Phase: The Most Skipped—and Most Important—Stage —Absorption is where patience pays off. During this phase, the charger increases the voltage and gradually reduces the current to saturate the plates fully. This is where battery capacity is restored—not just surface charge.
Absorption can take seven to ten hours for a deeply discharged battery. If you cut this short, sulfation begins all over again. Anyone asking how long to charge a car battery needs to understand that absorption time is not optional—it’s essential. Skipping the absorption stage dramatically shortens battery life.
How Long Does It Take to Charge a Car Battery?
Charging time depends on:
• Battery size
• Battery condition
• Charger amperage
• Battery chemistry
Typical charging times are:
Charger Output Approximate Time
• 2 amps 24-48 hours
• 4 amps 12-24 hours
• 10 amps 4-8 hours
• 20 amps 2-4 hours (only for approved chargers and batteries)
For maximum battery life, I almost always choose the slower charging rate.
Battery Charging Mistakes to Avoid
Mistake #1: Manual Mode Charging With High Amps and High Volts
Manual mode is where DIYers unintentionally kill batteries. In manual mode, many chargers output the maximum voltage and current simultaneously. That overheats the lead plates, causing them to warp and permanently damage the battery.
If you want to charge a car battery safely, automatic mode is your friend. Intelligent chargers regulate voltage and current independently. Manual mode doesn’t—and that difference matters.
Mistake #2: Charging a Car Battery by Driving the Vehicle
One of the biggest myths in automotive repair is that driving will fully recharge a dead battery. The problem with driving the vehicle to recharge a dead battery is that most people never drive long enough to complete all three phases of the recharging process. That can take almost an hour’s worth of driving.
Even if you drive for 30 minutes at highway speeds and manage to complete the reconditioning phase, you’ll never reach bulk charging mode, so you’ll never even enter absorption mode. So your battery will be in a constant state of discharge.
Mistake #3: Idling to Recharge a Car Battery
At idle, your alternator produces roughly 35% of its rated output. Modern vehicles consume a LOT of power to run multiple computers, accident-avoidance cameras, and direct fuel injection. In other words, you use that 35% just to run the engine. Idling doesn’t produce enough extra power to recharge the car battery.
If you have an older car without those high-current-draw components, that 35% would take four to ten hours to recharge your car battery at idle—and you still wouldn’t complete absorption. Meanwhile, the alternator is working its hardest at that low RPM.
If you’re serious about learning how long to charge a car battery, idling should never be part of your strategy.
• Mistake #4: Charging Without Cleaning Battery Terminals
Corrosion adds resistance, and resistance creates heat. Before you charge a car battery, take ten minutes to clean the terminals and posts. That simple step improves charging efficiency and protects both the battery and the charging system.
Your Alternator Isn’t a Battery Charger
Modern alternators can produce huge amperage—but only for brief periods. Forcing them to recharge a dead battery overheats the diodes and stator windings. That’s a costly mistake.
A good battery charger costs under $75. A failed alternator can cost $800–$1,000 to install. I’ve seen this mistake more times than I can count.
Dirty battery terminals can kill your battery and your charging system. Here’s how to clean battery terminals.
For more information on what causes battery sulphation, see this post.
More on the battery reconditioning phase
As shown in the chart below from Solar, a car battery charger with a reconditioning feature initiates recharging at approximately 4 V and 7 A. That’s called the energizing phase. Then it boosts the charging current to approximately 13.5 A while slowly ramping the voltage to a peak of approximately 14.5 V in phase 3. In the third, or absorption, phase, it maintains a constant voltage while ramping down the current. The 4th phase lowers the voltage slightly and the current a bit more. In the 5th or resting phase, it drops current flow to 0 while maintaining around 12.5 volts. The 6th phase exercises the battery by pulling a load on the battery until it reaches the final restoration phase, where it raises amperage and voltage one last time.
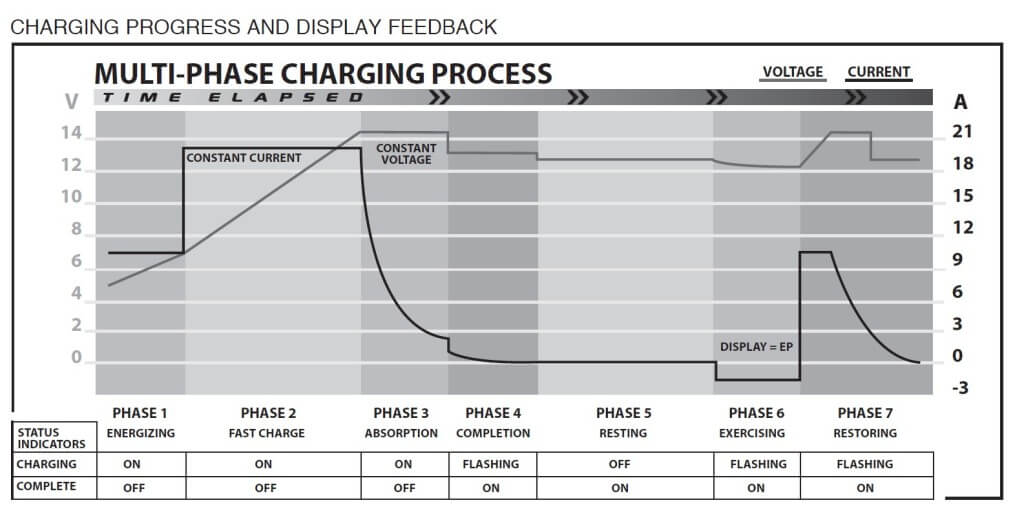
Notice the charging pattern for reconditioning a battery
Where can I get an intelligent battery charger?
Several reputable companies make intelligent battery chargers. Here are a few.
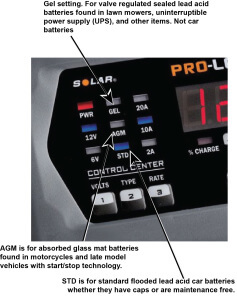
Buy a battery charger with settings for standard flooded lead-acid, GEL, and AGM
Solar Pro Logix
The Solar Pro Logix battery charger shown below has a “recondition” cycle for severely discharged and sulfated batteries. That reconditioning cycle can bring them back to life. You can use it to charge traditional “flooded” lead-acid batteries, as well as gel-cell and absorbed glass mat (AGM) batteries. Many electric start lawn mowers use gel-cell batteries and motorcycles are now using AGM batteries.

One example of a logic-based battery charger that’s safe for modern vehicles
CTEK Model CT5 TIME TO GO
TheCTEK Model CT5 TIME TO GO charger works with SLA, absorbed glass mat (AGM), GEL, Maintenance Free, and Calcium (Ca-Ca).
The unit includes

CTEK CT5 Time To Go battery charger
LEDs that indicate how much longer it will take to charge your battery. Plus, it tells you when the battery is charged enough to try starting.
Schumacher SC1359
The SC1359 intelligent charger has a 15A rapid charge mode and a 3A maintainer feature. It’s microprocessor-controlled and automatically adjusts the amperage rate to charge and maintain your vehicle battery. The charger works with SLA, AGM and GEL batteries.

Schumacher SC1359 Battery Charger
Can a jump start damage your car? See this post
What’s the average life of a modern car battery? Clue, it’s shorten than you think. See this post.
Replacing your car battery? Times have changed. Follow this new procedure.
Charging an AGM Battery
AGM batteries require slightly different charging voltages than conventional flooded batteries.
Always:
• Select AGM mode on the charger.
• Never exceed the recommended charging voltage.
• Avoid using old manual chargers.
Using the wrong charger can permanently damage an AGM battery.
When Charging Won’t Save the Battery
Sometimes charging isn’t enough.
Replace the battery if:
• It won’t accept a charge.
• Voltage quickly drops after charging.
• Conductance test fails.
• Case is swollen.
• Electrolyte has frozen.
• Battery is more than five to six years old and repeatedly goes dead.
Safety Tips When Charging a Car Battery
I never charge a battery without following these precautions:
• Wear eye protection.
• Charge in a well-ventilated area.
• Keep sparks and flames away.
• Disconnect the charger before removing the clamps.
• Never charge a frozen battery.
• Use the correct charger settings.
Final Thoughts
Learning how to charge a car battery isn’t difficult, but doing it correctly makes a tremendous difference in battery life.
A smart charger, a little patience, and the proper charging procedure can often restore a battery that many people would mistakenly replace. On the other hand, charging too quickly or depending on your alternator to recover a dead battery can lead to premature battery failure and expensive charging-system repairs.
Whenever possible, I recommend charging slowly with an intelligent charger and allowing it to complete every charging stage. Your battery—and your wallet—will thank you.
© 2012 Rick Muscoplat
Posted on by Rick Muscoplat