Diagnose car AC with gauges
How to diagnose your car AC with gauges
Using a manifold gauge set to diagnose car AC issues
You’ll need a manifold gauge set if you want to properly diagnose your car AC with gauges. You can’t really diagnose with just a low-pressure gauge from a DIY AC recharge kit. You’ll also need temperature probes and a multimeter that accepts K-style fittings. For more information about conducting tests using temperature probes, see this post.
Measure static pressure
With the AC system off for at least 30 minutes, check the pressure readings on the high and low side gauges. If they are about the same, the system has equalized and you can record the stating pressure reading.
Then measure the underhood air temperature. Refer the temperature pressure chart below to see what static pressure should be for the measured air temperature. If the static pressure reading is close to the chart, then conduct a running pressure test. If the static pressure reading is below what’s listed on the chart, the system is low on refrigerant that’s caused by a leak. That also means you most likely have air in the system. If you add more refrigerant without removing the air, the system won’t cool properly.
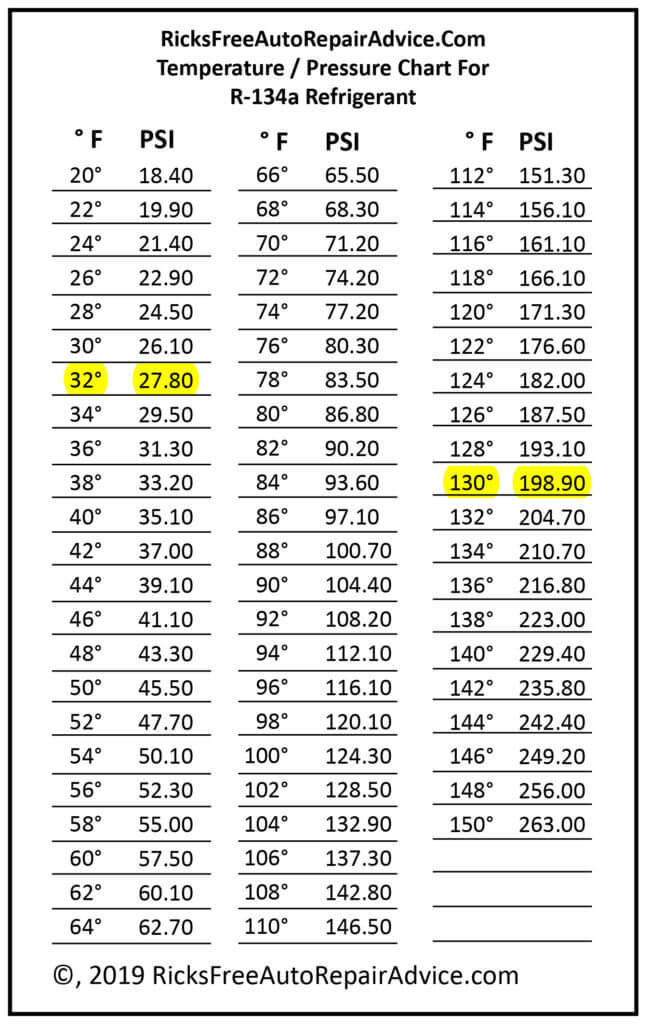
If your static pressure doesn’t match the pressure temperature chart above, you probably have air in the system. If the high and low gauges read 0, the system is empty.
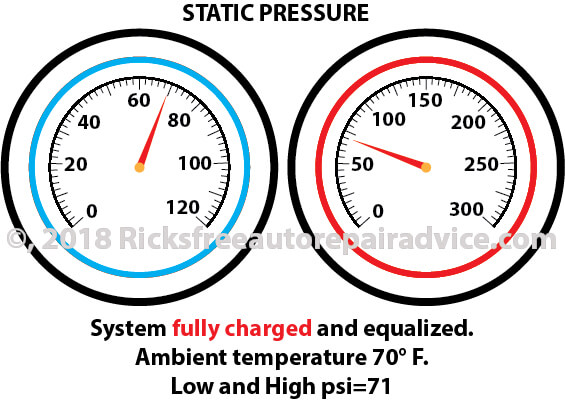
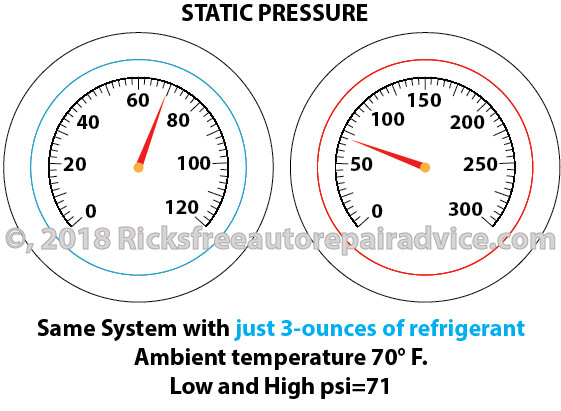
3-ounce partial charge at 70° shows the SAME pressure as a fully charged system
What the AC gauges can tell you when the system is running
Let’s get this straight from the get-go, gauges can tell you if the system pressures are in a normal range, over-pressurized, or under-pressurized, but they CANNOT tell you if the system has the correct charge. The ONLY way to know if your system is properly charged is to evacuate it and add new refrigerant with a scale. In other words, if your system is low on charge, you can’t use your gauge set to add refrigerant to get to factory specified fill capacity. The same applies if your system is overcharged. You can’t recover refrigerant through the gauges to get down to the factory specified fill capacity.
But gauges can give you a rough idea of what might be going on with your system when it’s running. Let’s take a look at some scenarios.
What you have to know about your system before using AC gauges
• You must know ambient air temperature.
Measure temperature about 1-ft in front of the grille. This is really important. Don’t go by the temperature from a news or weather service. It must be the temperature of the air coming into your car’s condenser.
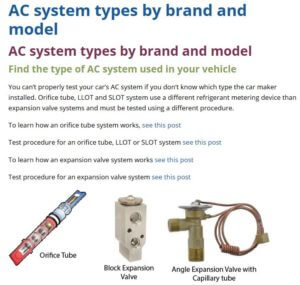
• You must know the type of system in your vehicle — orifice tube
or expansion valve. To find out what in your vehicle, click on the image to the right and find your vehicle.
• You must know the type of compressor in your vehicle. For example, you might see a low high side pressure and determine the compressor is bad, when in fact, your vehicle is equipped with a variable displacement compressor.
• You must use a pressure temperature chart or be using diagnostic gauges
Step 1: Find out what type of refrigerant metering device your car uses
Click on the image above and find the type of refrigerant metering device your vehicle uses. What is this so important? Because expansion valve systems usually show a lower suction side pressure than an orifice tube system. If you don’t know which system you have, you can misinterpret the low side readings right off the bat and think your system is undercharged. See the pressure chart below to see what I mean.
R-134a TEMPERATURE PRESSURE CHART FOR ORIFICE TUBE SYSTEM — ENGINE AND AC RUNNING
Ambient Temperature °F/°C Low-Pressure Gauge High-Pressure Gauge
65°F Low side pressure 25-35 psi High side pressure 135-155 psi
70°F Low side pressure 35-40 psi High side pressure 145-160 psi
75°F Low side pressure 35-45 psi High side pressure 150-170 psi
80°F Low side pressure 40-50 psi High side pressure 175-210 psi
85°F Low side pressure 45-55 psi High side pressure 225-250 psi
90°F Low side pressure 45-55 psi High side pressure 250-270 psi
95°F Low side pressure 50.55 psi High side pressure 275.300 psi
100°F Low side pressure 50-55 psi High side pressure 315-325 psi
105°F Low side pressure 50-55 psi High side pressure 330-335 psi
110°F Low side pressure 50.55 psi High side pressure 340.345 psi
Ambient temp is the outside atmospheric temperature.
R-134a TEMPERATURE PRESSURE CHART FOR EXPANSION VALVE SYSTEM— ENGINE AND AC RUNNING
Ambient Temperature °F/°C Low-Pressure Gauge High-Pressure Gauge
60°F Low side pressure 7-15 psi High side pressure 120-170 psi
70°F Low side pressure 7-15 psi High side pressure 150-250 psi
75°F Low side pressure 35-45 psi High side pressure 150-170 psi
80°F Low side pressure 40-50 psi High side pressure 175-210 psi
85°F Low side pressure 45-55 psi High side pressure 225-250 psi
90°F Low side pressure 45-55 psi High side pressure 250-270 psi
95°F Low side pressure 50.55 psi High side pressure 275.300 psi
100°F Low side pressure 50-55 psi High side pressure 315-325 psi
105°F Low side pressure 50-55 psi High side pressure 330-335 psi
110°F Low side pressure 50.55 psi High side pressure 340.345 ps
Step 2: Connect the gauges to your car’s AC ports
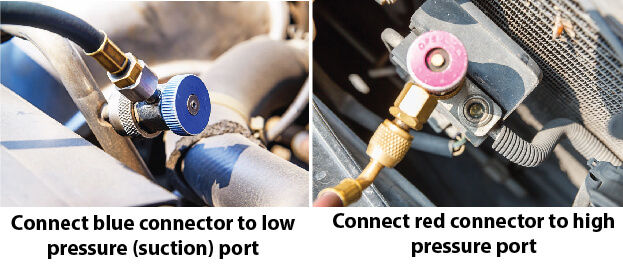
Unscrew the protective port caps and store in a safe place. Connect the quick release connectors to the service ports on the high and low side refrigerant hoses. Some low pressure ports are located on the accumulator, while others are located on the metal portion of the lines. High pressure ports can be located on the receiver/drier or near the condenser
Step 3: Measure ambient temperature
Then use the chart below to find “normal” pressures for that temperature.
R-134a TEMPERATURE PRESSURE CHART FOR ORIFICE TUBE SYSTEM WHILE RUNNING
Ambient Temperature °F/°C Low-Pressure Gauge High-Pressure Gauge
65°F Low side pressure 25-35 psi High side pressure 135-155 psi
70°F Low side pressure 35-40 psi High side pressure 145-160 psi
75°F Low side pressure 35-45 psi High side pressure 150-170 psi
80°F Low side pressure 40-50 psi High side pressure 175-210 psi
85°F Low side pressure 45-55 psi High side pressure 225-250 psi
90°F Low side pressure 45-55 psi High side pressure 250-270 psi
95°F Low side pressure 50.55 psi High side pressure 275.300 psi
100°F Low side pressure 50-55 psi High side pressure 315-325 psi
105°F Low side pressure 50-55 psi High side pressure 330-335 psi
110°F Low side pressure 50.55 psi High side pressure 340.345 psi
Ambient temp is the outside atmospheric temperature.
R-134a TEMPERATURE PRESSURE CHART FOR EXPANSION VALVE SYSTEM
Ambient Temperature °F/°C Low-Pressure Gauge High-Pressure Gauge
60°F Low side pressure 7-15 psi High side pressure 120-170 psi
70°F Low side pressure 7-15 psi High side pressure 150-250 psi
75°F Low side pressure 35-45 psi High side pressure 150-170 psi
80°F Low side pressure 40-50 psi High side pressure 175-210 psi
85°F Low side pressure 45-55 psi High side pressure 225-250 psi
90°F Low side pressure 45-55 psi High side pressure 250-270 psi
95°F Low side pressure 50.55 psi High side pressure 275.300 psi
100°F Low side pressure 50-55 psi High side pressure 315-325 psi
105°F Low side pressure 50-55 psi High side pressure 330-335 psi
110°F Low side pressure 50.55 psi High side pressure 340.345 ps
Step 3: Read the car AC gauges
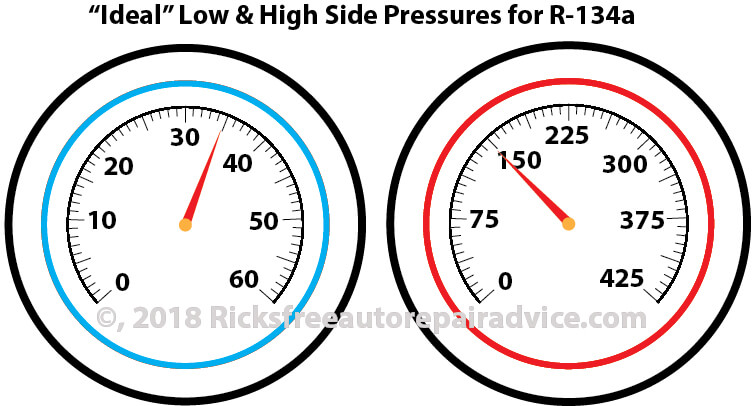
With the engine running and AC on and an ambient temperature of 75°F, a typical normal reading is around 35/150
©, 2018 Rick Muscoplat
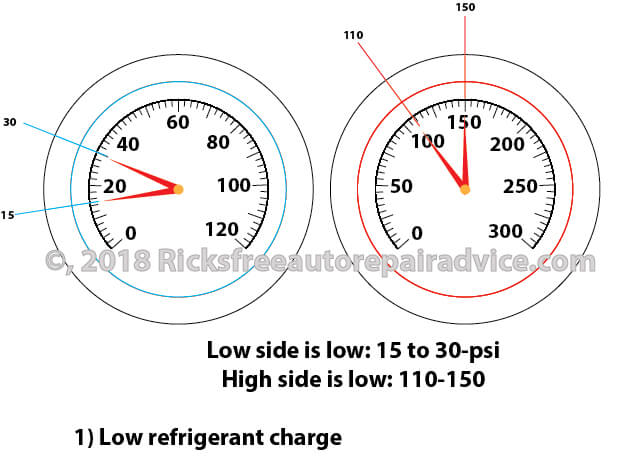
AC manifold gauges show system is low on charge
Here the gauges show lower than normal pressures on both the high and low sides. This is an indication of a low charge
Posted on by Rick Muscoplat

